“Old wood tables are not worth saving. Just buy a new one; paint will never look right.”
That line holds people back all the time. It is false. Completely. A tired wood table can look clean, modern, and strong with paint, and it can link perfectly to any renovation you are planning. The trick is not magic. It is a clear process, a bit of patience, and understanding what paint can and cannot do on old wood.
If you are in the middle of a home renovation, or even thinking about one, this is where upcycling starts to make real sense. Instead of sending that table to the curb, you turn it into a piece that supports the new style you want. I might be wrong, but most people do not fail because they chose the wrong color. They fail because they rushed the prep.
Painting an old wood table is not just about covering scratches. It is about deciding what role that table plays in your updated space. Is it a quiet, simple piece in a clean white room? Is it a dark anchor under bright chairs? Or is it a bold accent in a neutral renovation? Once that role is clear, the steps make a lot more sense.
You do not need to be a professional painter. You do not need a workshop. You do need to be willing to sand, clean, and wait for paint to dry. Those are the boring parts, and they are the parts that make the end result look like a custom piece instead of a rushed weekend mistake.
“Primer is optional if the table already has a finish on it.”
This one is dangerous. Primer is not optional on most old wood tables, especially if you want the surface to stand up to daily use. Primer helps paint grip, it hides old stain, and it helps block wood tannins from bleeding through. Skipping it might look fine on day one. By day thirty, you start to see patches, chips, and color shift.
So the real question is not “Should I paint my old table?” The real question is “How do I paint this table so it actually works with my renovation and holds up over time?” That is what we will walk through. Not just the paint, but also how this one project can connect to the bigger change you are making at home.
“You have to strip every old finish back to bare wood for paint to work.”
That one scares people into giving up. It is not true for most tables. You often only need to scuff sand and fix damaged spots. Full stripping is only needed when the old finish is flaking badly, is sticky, or you want a natural wood top instead of paint.
How painted tables connect to your renovation
Painting a table is not just a craft project. It sits right in the middle of design, budget, and function. If your renovation aims for a cleaner kitchen, a lighter dining room, or a more open living space, that table either supports that story or fights it.
Think about three simple questions before you touch a brush:
1. Where will this table live after the renovation?
2. How will it be used every day?
3. What do you want people to notice first when they enter the room?
If the room is getting new flooring, new wall color, maybe new lighting, the table should not feel like an afterthought. It can repeat the trim color. It can echo the cabinet color. Or it can sit in contrast and give the room some strength.
I might be wrong, but many renovations fail visually because too many new items arrive at once with no link to what is already there. Upcycling, especially a big piece like a table, builds that bridge between old and new. It keeps some sense of continuity so your home does not feel like a showroom that just landed in your life.
Choosing a style direction for the table
Before you sand anything, lock in the style direction. This is where people drift, repaint, and waste time.
You can think in three broad paths:
– Classic and quiet: whites, off-whites, soft grays.
– Warm and grounding: warm taupes, greige, mid wood tones with painted legs.
– Bold accent: navy, black, deep green, or a rich color that stands out.
Each path relates differently to renovation choices.
If your renovation has white cabinets and light floors, a black or deep navy table can give the room structure. If your space is already dark, a light table can keep the room from feeling heavy. A mid-tone table can calm sharp contrasts.
Here is a simple table that ties paint choices to common renovation directions:
| Renovation Direction | Wall / Cabinet Colors | Table Paint Idea | Effect in the Room |
|---|---|---|---|
| Bright, clean kitchen | White walls, white or light cabinets | Black or dark navy base, natural or light-stained top | Adds contrast, keeps room from feeling flat |
| Warm modern dining | Warm white or beige walls, wood accents | Soft greige or warm gray all over | Feels calm, supports mixed woods |
| Minimal living area | Light gray walls, simple trim | All white or off-white table | Blends in, puts focus on art or textiles |
| Color-focused space | Neutral walls, colorful art or chairs | Deep green, indigo, or muted teal | Acts as an anchor without shouting |
You do not need to overthink it. You only need to avoid guessing halfway through. Decide the direction now, and the next choices get easier.
Assessing your old table: keep, fix, or pass
Before you spend time and money, be honest about the table in front of you. Not every piece is worth the work.
Look at:
– Structure: Does it wobble? Are joints loose? Are screws stripped?
– Surface: Deep scratches, rings, chipped veneer, water damage.
– Function: Is the size right for your renovated room?
If the base is solid but the top is ruined, you can still win by painting or even replacing just the top. If the table is wobbly, full of mold, or warped, painting will not fix those problems.
Here is a quick way to think about it:
| Condition | What You See | Decision |
|---|---|---|
| Good base, rough top | Stable legs, scratched or stained top | Good candidate for paint or two-tone finish |
| Loose joints | Wobble when pushed, gaps at corners | Repair joints, then paint |
| Peeling veneer | Thin layer lifting from surface | Glue, fill, or remove veneer before paint |
| Structural damage | Cracked legs, severe warping | Skip or repurpose parts; do not paint as-is |
If your renovation goal includes sustainability or budget control, saving a structurally sound table makes sense. Buying new for the sake of convenience often leads to generic choices that do not match your home as well as a customized piece.
Planning: finish type, tools, and timeline
This is where your renovation link gets clear. Your table finish should match both the look and the wear pattern of the room.
Pick the right paint and topcoat
You have a few main paint choices for old wood tables:
| Paint Type | Pros | Cons | Best Use |
|---|---|---|---|
| Acrylic latex (furniture-grade) | Easy to work with, water clean-up, low odor | Needs good primer and topcoat on high-use tables | Dining tables, desks, coffee tables |
| Alkyd / hybrid enamel | Harder finish, self-leveling | More smell, longer cure time | Kitchen tables, heavy-use pieces |
| Chalk-style paint | Good adhesion, easy distressing | Must be sealed, can mark easily without strong topcoat | Vintage looks, occasional-use tables |
For a renovation that you want to last, I lean toward a good primer plus a furniture-grade acrylic or hybrid enamel, then a clear topcoat on the table top. That mix holds up to plates, laptops, kids, and the real daily wear most marketing photos ignore.
Topcoat options:
– Water-based polyurethane: clear, less yellowing, easy to apply.
– Oil-based polyurethane: tougher, but yellows over time and smells more.
– Hard-wearing clear furniture lacquer: better sprayed, stronger learning curve.
If your renovation has a lot of white or cool colors, water-based clear coats help keep the color stable.
Tools and supplies you actually need
You do not need a full shop. You do need the right basics. Here is a focused list:
– Sandpaper: 80, 120, 180, 220 grit.
– Sanding block or random orbital sander.
– Wood filler and a flexible putty knife.
– Degreaser or strong cleaner (like TSP substitute).
– Tack cloth or microfiber cloths.
– Quality primer (bonding primer for glossy finishes).
– Paint (furniture-grade recommended).
– Topcoat (water-based polyurethane for most projects).
– Foam roller with tray, and a good quality angled brush.
– Painter’s tape.
– Drop cloth and protective gear (mask, safety glasses).
If your renovation already has painting tasks, you can use some of the same tools. That link keeps your costs lower and your learning curve flatter.
Timeline and curing
This is where people get impatient. A table might be dry to the touch in a few hours, but it can take weeks to reach full cure. During that time, the finish is softer and easier to mark.
A realistic simple schedule:
| Stage | Time Block | Notes |
|---|---|---|
| Cleaning & assessment | 1 to 2 hours | Remove grime, check structure |
| Repairs & filling | 1 to 3 hours + drying | Glue, clamp, fill, dry overnight if needed |
| Sanding & priming | Half day | Scuff sand, prime, dry |
| Paint coats | 1 to 2 days | 2 to 3 coats with drying between |
| Topcoat (if used) | 1 day | 2 to 3 thin coats |
| Cure time before heavy use | 7 to 30 days | Light use only at first |
You can see how this connects to a renovation schedule. You can work on the table while walls dry, or while flooring is installed. The key is not to rush the last step. Many people do the hard work well, then ruin it by setting heavy items on the table on day two.
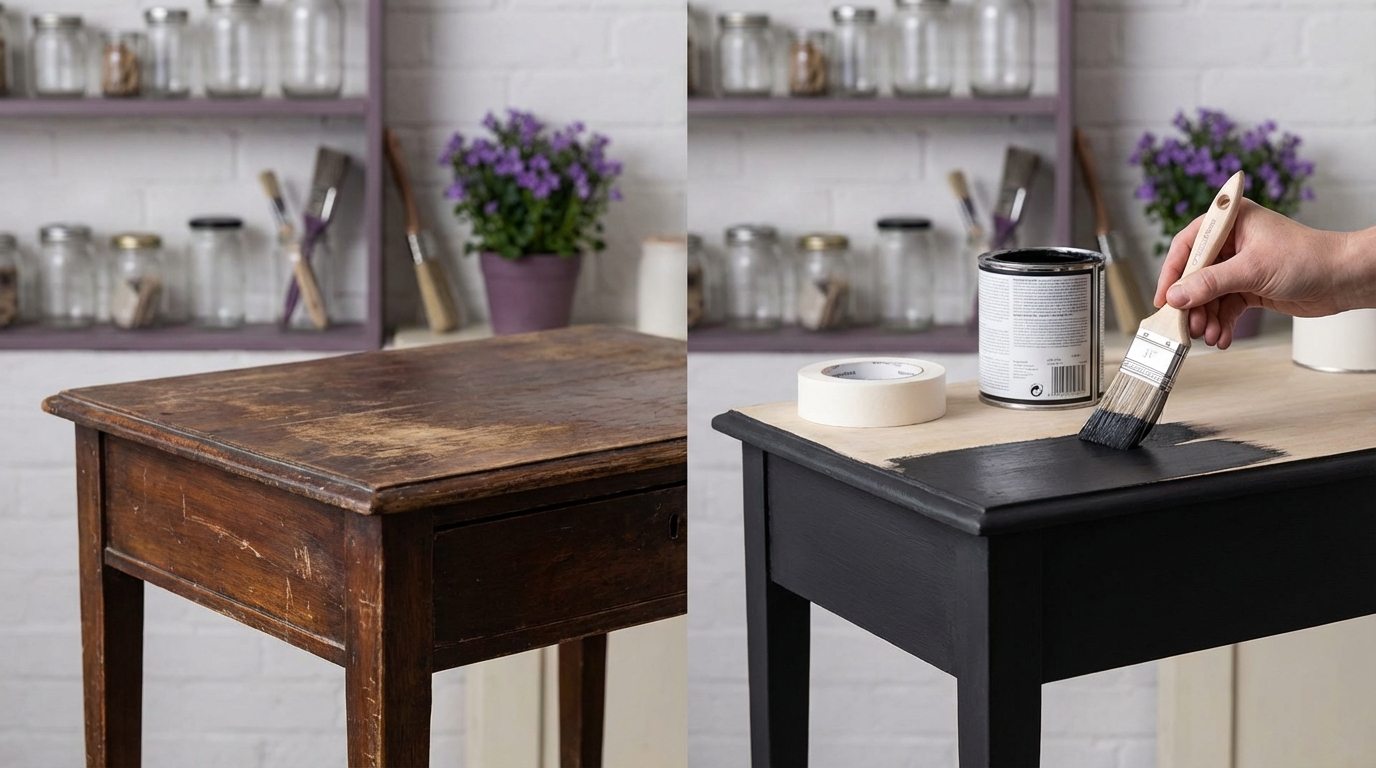
Step-by-step: from old finish to painted table
Now we get practical. This is a straightforward path that works on most wood tables.
1. Clean the table deeply
Years of oils, polishes, and grease sit on old finishes. Paint does not like them.
– Remove any wax, silicone polish, or grease with a degreaser or TSP substitute.
– Wipe from top to bottom, including legs and underside edges.
– Rinse with clean water and let the piece dry fully.
This stage feels boring, but if you skip it, your primer and paint might peel or fish-eye.
2. Fix structure and damage
Now check wobble and damage again, but with the surface clean you can see more.
– Tighten screws and bolts.
– For loose joints, add wood glue into the joint, clamp, and let dry according to instructions.
– Fill deep scratches, dents, or chipped veneer with wood filler in thin layers.
– Sand the filler level once it dries.
If your renovation includes moving the table to a different room, this is the moment to adjust height or function. Example: cutting down a dining table to become a coffee table, then painting it to match the living room plan. That link between function and finish matters more than we tend to admit.
3. Sand: scuff, not always strip
This is where the misconception about “bare wood or nothing” shows up.
For many old tables:
– Start with 120 or 150 grit sandpaper to scuff the whole surface.
– Aim for a dull, even surface, not bare wood.
– Feather any chipped finish so there are no sharp steps.
– Finish the final pass with 180 or 220 grit on the top to smooth it.
If the finish is flaking badly or you see areas where the finish is failing deeply, then you may need to go lower in grit (like 80) in those areas and bring them back up to 180 or 220.
After sanding, remove dust with a vacuum and then a tack cloth or microfiber.
“If you see any gloss at all after sanding, the primer will not stick.”
This is not always true. A quality bonding primer can stick to many lightly glossy surfaces, as long as they are clean and scuffed. The goal is not zero gloss; the goal is mechanical tooth for primer to grab.
4. Prime for adhesion and stain blocking
Primer is your friend, especially over dark stain, knotty wood, or unknown old finishes.
– Use a bonding primer if the existing finish was glossy or unknown.
– Use a stain-blocking primer if the wood shows knots or you are covering dark stain with a light color.
– Apply thin, even coats with a brush and foam roller.
– Do not overload corners and edges; drips are hard to sand later.
Let the primer dry per instructions, then give it a light sand with 220 grit to knock down raised grain and dust nibs. Wipe clean again.
If you see strong bleed-through (yellow or brown spots), add a second coat of primer.
5. Apply paint in thin, steady coats
Now you start to see the transformation. This is also where impatience starts to creep in.
– Stir paint, do not shake, to avoid bubbles.
– Cut in edges and corners with a good angled brush.
– Roll larger flat areas with a foam roller for a smoother finish.
– Aim for thin coats. The first coat will look weak. That is normal.
– Lightly sand between coats with 320 or 400 grit if you feel roughness.
Two to three coats usually work for good coverage. Dark colors might cover in two; light colors over dark primer might need three.
Watch edges. Thick paint at edges chips more easily in daily use.
6. Seal high-wear areas
If the table is decorative or used lightly, your paint might be enough on its own, if it is a hard enamel. For dining tables, desks, or kitchen tables, a clear topcoat on the top surface is a safer move.
– Choose a water-based polyurethane if you want clear protection with less yellowing.
– Apply thin coats with a high-quality synthetic brush or foam applicator.
– Avoid over-brushing; let it level.
– Lightly sand between coats, then wipe clean.
Two to three thin coats usually work. Let the final coat cure as long as the can suggests before heavy use.
“Topcoat always makes furniture look plastic.”
That can happen with thick, glossy coats. A matte or satin water-based clear coat in thin layers can protect the surface without a heavy shine. If your renovation aims for a calm, modern feel, satin is often a good middle ground.
Design choices that connect to your renovation
This is where you push the project from “just painted” to something that actually supports your space.
Color strategies that sync with the room
You can tie the table to your renovation in a few simple ways:
– Match a fixed element: cabinet color, interior door color, or trim.
– Echo a secondary color: color from a rug, artwork, or tile.
– Use a neutral that repeats in several rooms: one gray or white across spaces.
If you are painting kitchen cabinets, consider painting the table base the same color, and keeping or re-staining a wood top. That connection can make modest renovations feel unified without buying all new furniture.
Another angle: if you have open-concept rooms, you can use related tones. For example, soft gray kitchen cabinets, a deeper gray table, and black chairs. Each element is distinct, but they live in the same range.
Finish and texture choices
You can adjust how serious or informal the table feels by changing sheen and texture.
– Matte paint: softer look, more forgiving of surface flaws, can mark more easily.
– Satin: balanced, works well in most rooms.
– Semi-gloss: sharper look, highlights surface prep, can feel colder in some spaces.
If your renovation leans very clean and minimal, a finer, smoother table finish will fit better. If it leans warm and relaxed, a soft satin with tiny brush marks can feel more human and less rigid.
You can also mix finishes: painted base, clear-coated wood top, or painted top with wood legs. This is particularly useful when the top has damage that needs paint, but the legs have nice grain you want to keep.
Hardware and small details
If your table has drawers or metal details, match or complement other metal finishes in the renovated room: handles, lighting, faucets.
– Black handles with black light fixtures for a clear, simple look.
– Brushed nickel or stainless with modern kitchens.
– Warm brass or bronze with warmer color palettes.
These tiny decisions create a sense of flow. People will not always notice them directly, but they feel the consistency.
Common mistakes and how to avoid them
It might sound harsh, but some common approaches are just bad. If you are doing any of these, you are making your life harder.
Skipping prep and relying on “no prep” paint
Many products claim “no sanding needed.” In practice, on old tables that have seen oils, waxes, and cleaners, skipping sanding and cleaning is risky.
Bad approach: Wiping with a damp cloth only, rolling paint right over a glossy, dirty finish, and trusting the can.
Better approach: Clean, scuff sand, then use a bonding primer, even if the paint says you do not have to. It takes a few extra hours and saves you from peeling and chipping later.
Using wall paint leftovers on furniture
Reusing paint is smart in some cases, but wall paint is not made for the abuse a table gets.
Bad approach: Slapping leftover flat wall paint on a tabletop.
This often leads to marks, stains, and poor cleanability.
Better approach: If you want to reuse color, get that color mixed in a furniture-grade or trim enamel paint, then seal the top. That gives you the visual consistency with the performance you need.
Rushing drying and curing times
This one ruins many projects right at the finish line.
Bad approach: Painting on Saturday, then hosting a dinner on Sunday at that same table.
The paint might be dry to the touch, but not cured. Plates, cups, or decorations can leave marks or stick slightly.
Better approach: Plan light use only for the first week or two. Use a tablecloth or protective pads if you must use the table sooner. I might be wrong, but treating those first weeks as part of the project, not an afterthought, makes a clear difference in how long the finish looks good.
Ignoring how the table fits the new space
Sometimes people invest time into painting a table, then realize it is too big, too small, or the wrong height for the renovated room.
Bad approach: Starting the project before you have clear measurements and room layout.
Better approach: Measure the new room, check circulation space around the table, and confirm that the piece actually works in the new plan. If not, you can cut it down, repurpose it (for example, into a desk or console), or trade it before you invest all the painting time.
Upcycling as a link between old and new
When you renovate, it is easy to fall into a cycle of “out with the old, in with the new.” Sometimes that is needed. Sometimes it just leads to more spending and less character.
Painting an old wood table sits in the middle. It respects that the piece had a life, but it does not lock you into the old style. It brings the table into line with the new room in a cost-effective way.
If you choose the color thoughtfully, prep with care, and give the finish time to cure, your upcycled table will not feel like a compromise. It will sit in the room as if you planned it from day one of the renovation.
And if, later on, your style shifts again, you can sand lightly and repaint. That is the quiet power of a good painted surface: it gives you room to change without starting from zero every time.