“You can clean a laptop screen with any household cleaner as long as you are gentle.”
That statement is false, and sometimes costly. If you grab glass cleaner, surface spray, or alcohol wipes for your laptop screen, you risk streaks, clouding, or permanent damage. The safe way to clean your laptop screen is simple: power the laptop off, let it cool, use a clean microfiber cloth, and if needed, a small amount of distilled water or a screen-safe cleaner. Nothing stronger. Nothing sprayed directly on the screen.
Most people do not damage their screens with one cleaning. It happens slowly. A tiny bit of ammonia here. A little too much pressure there. Then one day you notice a bright patch, a weird rainbow stain, or the anti-glare coating peeling away. That is why getting this right matters. A screen replacement can cost a large share of what the laptop is worth.
I might be wrong, but it seems to me that many guides either overcomplicate this topic or give advice that belongs in the early 2000s, before modern LCD coatings became common. Old habits like “just use Windex” still hang around. Modern laptop screens are different. They often have delicate coatings on top of the glass or plastic. Those coatings do not like strong chemicals.
So instead of random hacks, think in simple steps. You want to remove dust, fingerprints, and smudges while touching the screen as little and as gently as you can. That is the whole game. The rest is small technique details.
You already have most of what you need: a soft cloth, patience, and the discipline not to spray anything on the screen. If that sounds too basic, remember that almost all screen damage from cleaning comes from doing more than you should, not less.
Let us walk through what works, what does not, and how to fix some of the mistakes if you already made them.
“I have always used regular glass cleaner on every screen I own and nothing bad has ever happened.”
You might have been lucky so far. Or your screens had different coatings, or were older models with tougher glass. That does not make the method safe for your current laptop. Newer panels can be more sensitive. Also, damage can start small and go unnoticed until it spreads.
Pressure and the wrong liquid are the real problems. If you keep those under control, your screen can stay clear for years.
—
Why Laptop Screens Are Easy To Ruin
Laptop screens may look like simple glass, but there is more going on. In many cases you are not touching glass itself. You are touching:
– A thin plastic layer.
– A matte or glossy coating.
– Sometimes an anti-reflective or anti-smudge layer.
These layers are very thin. Strong chemicals can react with them. Ammonia, strong alcohol solutions, and solvents can:
– Strip coatings.
– Leave permanent streaks.
– Make the surface cloudy.
– Create rainbow patterns that do not wipe away.
Rough cloths cause another kind of trouble. Paper towels, tissues, or that old T-shirt can trap small particles. When you rub those across a soft surface, they work like very fine sandpaper. You see that as hairline scratches or “haze” over time.
On top of that, screens do not like pressure. Press hard and you push liquid inside the screen edges, or damage pixels below. That is why light, even contact is safer than “scrubbing one spot until it looks perfect.” If you have ever seen a “pressure mark” that looks like a bruise on a screen, that is what happened.
So the job is simple: clean off dust and oils without harsh chemicals, rough material, or pressure. That is the whole playbook.
“Distilled water and a microfiber cloth are enough for almost every laptop screen cleaning job.”
That statement is true in most cases. Extra products help with heavy grime, but you will rarely need them if you clean your screen gently on a regular basis.
—
What You Should Never Use On a Laptop Screen
Before going into the right method, it helps to be very clear about what to avoid. Some of this might go against what you have done for years, so I will be direct.
Unsafe Liquids for Laptop Screens
Avoid these on any modern laptop screen:
– Window and glass cleaner sprays.
– All-purpose household cleaners.
– Alcohol wipes that are marked for surfaces, not electronics.
– Products with ammonia, bleach, or strong fragrance.
– Vinegar (even diluted).
– Hydrogen peroxide.
– Acetone or nail polish remover.
– Any degreaser or kitchen cleaner.
The common theme is strong chemicals that cut through grease. Those often cut through coatings too.
Unsafe Tools for Laptop Screens
Avoid these tools, even if they feel soft:
– Paper towels.
– Toilet paper, napkins, or tissues.
– Old cotton T-shirts with rough fibers.
– Kitchen sponges, even on the “soft” side.
– Scrub pads or magic eraser style sponges.
– Compressed air held very close with the nozzle almost touching.
Some of those can cause micro-scratches. Others can leave lint that sticks to the screen or drag dust around.
Here is a quick comparison you can skim later.
| Item | Safe / Unsafe | Reason |
|---|---|---|
| Distilled water | Safe | Leaves no mineral spots, gentle on coatings |
| Tap water | Mostly safe, not ideal | Can leave mineral spots, clean up well and it is usually fine |
| Screen cleaner for electronics | Safe (check label) | Formulated for LCD/OLED and coatings |
| Window / glass cleaner | Unsafe | Often contains ammonia, can damage coatings |
| Rubbing alcohol 70%+ | Risky | Can dry or strip coatings over time |
| Paper towels | Unsafe | Fibers can scratch and shed on the screen |
| Microfiber cloth | Safe | Soft, low lint, designed for delicate surfaces |
| Magic eraser | Unsafe | Works like very fine sandpaper |
| Dry cotton T-shirt | Not ideal | Can be too rough, can drag dust and cause marks |
If a product is not clearly marked as safe for LCD / LED / OLED screens or electronics, treat it as unsafe.
—
What You Need To Clean Your Laptop Screen Safely
Let us set up a simple cleaning kit. You can keep this in a drawer and pull it out any time your screen looks bad.
Basic Screen Cleaning Kit
Here is what you actually need:
– One or two clean microfiber cloths.
– Distilled water in a small spray bottle or dropper.
– An electronics screen cleaner (optional but helpful).
– A can of compressed air (optional, for heavy dust).
That is it. You do not need multiple chemicals. You do not need special wipes if you already have a good cloth. The key is to keep the cloth clean and use very little liquid.
A note on microfiber cloths: reuse is fine, but not forever. If your cloth starts to feel rough, heavily stained, or full of lint, replace it. Cloth is cheap compared to a new screen.
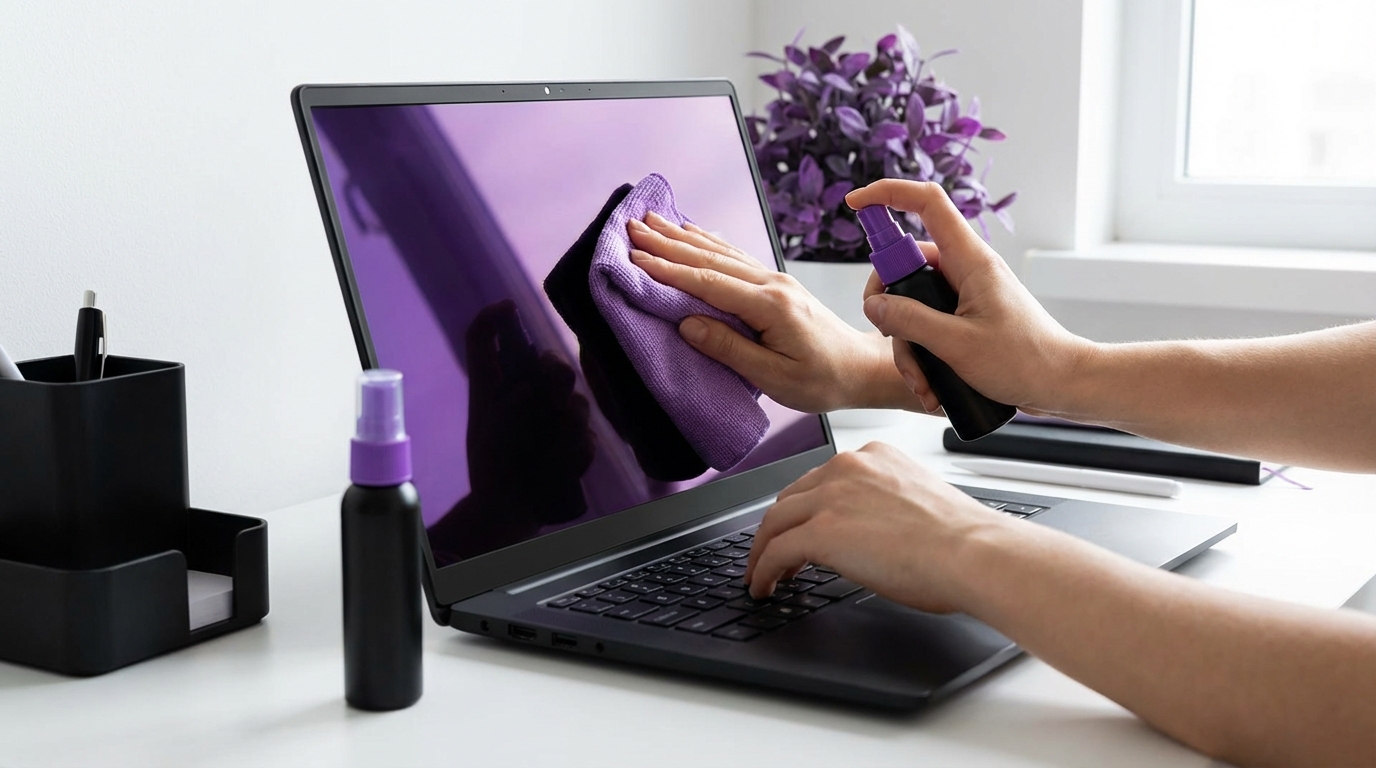
“Never spray liquid directly on your laptop screen. Always spray the cloth instead.”
This guideline matters more than many people think. Liquid that runs down the screen can find its way into the bezel and reach the electronics under the frame. That is where short circuits and weird blotches start.
—
Step-by-Step: How To Clean Your Laptop Screen Without Ruining It
Now to the actual method. I will keep this direct and practical.
Step 1: Power Down and Unplug
Shut the laptop down instead of just closing the lid. Then unplug the power cable and disconnect any accessories near the screen, like USB lights.
Why this matters:
– A dark screen shows dirt and streaks more clearly.
– No power means less static build-up that attracts dust.
– Zero risk of shorting anything if a drop of water goes where it should not.
Leave the laptop for a minute so the screen cools if it was running hot.
Step 2: Remove Loose Dust First (Dry Clean)
Before you go near the screen with liquid, clear dry dust.
You have two options:
– Take a clean, dry microfiber cloth and very lightly sweep across the screen. Do not press. Let the cloth glide with almost no weight.
– Or use compressed air from a short distance. Short bursts, angle the can slightly, and keep the nozzle a small distance away. Do not hold the can upside down.
Why this step matters: dry dust can act like tiny grains of sand. If you start rubbing a damp cloth on that dust, you can create faint scratches. Pull off the dust first, then tackle smudges.
If your cloth drags or snags, you are pressing too hard or the cloth is not clean.
Step 3: Prepare a Slightly Damp Cloth
Take a fresh microfiber cloth. Compared to paper towels, these are very soft and designed for surfaces like glasses or camera lenses.
Now:
– Lightly spray distilled water on a corner of the cloth. Two or three sprays at most.
– Or add one or two drops from a dropper and spread it into the cloth.
The cloth should be slightly damp, not wet. If you can see drops or feel any area close to soaked, that is too much water. Wringing microfiber is not great for it, so use a different section or a new cloth if needed.
If you use a screen cleaner:
– Spray the cleaner on the cloth, never on the screen.
– Use less than you think you need.
Step 4: Wipe the Screen Gently, In Straight Lines
Hold the laptop screen steady from the back or the hinge, without bending it. Then:
– Start at the top center of the screen.
– Wipe gently in straight, horizontal strokes from center to edge.
– Move down in small steps until you reach the bottom.
– Keep the pressure light and steady.
Short strokes are safer than big sweeping ones. Large circular motions can spread dirt around and leave streaks. Linear strokes are easier to control and easier to polish afterward.
If you hit a stubborn fingerprint or oily spot:
– Do not press harder.
– Go back to that area for one or two extra light passes.
– If it still does not move, add a tiny bit more moisture to the cloth, just for that section.
If the cloth starts to feel dry, switch to a damp part or refresh it very lightly. Do not keep scrubbing the same area with a dry cloth, or you might create static and pull more dust in.
Step 5: Dry and Buff With a Second Cloth
Take a second, fully dry microfiber cloth. This is your “buffing” cloth.
Repeat the same movement pattern:
– Light, horizontal strokes.
– No pressure on the panel.
– Cover the full screen, top to bottom.
This removes any light streaks, leftover moisture, and small pieces of lint. The goal is a clean, even look when the screen turns back on. If you only have one cloth, wait a moment for the screen to air dry, then lightly buff with a dry part of the same cloth.
Step 6: Inspect Under Good Light
Turn the laptop on and show a full white or light gray background if you can. A simple way is to open a text document or a blank browser tab.
Look for:
– Streaks.
– Missed smudges.
– Rainbow-like spots or clouds.
Minor streaks often come from using too much liquid or not buffing long enough. A few more passes with the dry cloth usually fix this. If a mark will not go away after multiple cleanings, it may be permanent damage or a defect in the screen itself.
At this point, if the screen looks clear and even, you are done.
—
How To Deal With Common Laptop Screen Problems
Not all screens are dirty in the same way. Fingerprints are different from coffee spray, and kids touching the screen with sticky hands is another level. The base method is the same, but you can adjust slightly.
Fingerprints and Oily Smudges
Fingerprints are mostly skin oil. Water alone lifts some of this, but a screen-safe cleaner can help.
Process:
– Dry dust removal with a microfiber cloth.
– Light passes with a slightly damp cloth, focusing on tracked areas.
– If marks remain, apply a small amount of screen cleaner to the cloth, not the screen.
– A few short, gentle strokes over the area.
– Buff dry.
Avoid the “scrub until it goes away” habit. If you have to choose, leave a faint mark instead of pressing so hard that pixels get damaged. It is easier to live with a soft smudge than a dead patch of screen.
Sticky Spots (Food, Drink, Children)
Sticky residue often comes from sugar or dried liquids. Those need a bit more moisture but still no strong chemicals.
Try this:
– Dry wipe to remove dust.
– Slightly damp cloth with distilled water.
– Hold the damp cloth against the sticky spot for a few seconds, without rubbing. You are softening the residue.
– Then use very short, light strokes to lift it off.
Repeat if needed. Patient soaking and lifting is safer than trying to scrape. Never use a fingernail or any tool on the screen surface.
If the mess is on the keyboard too, clean that separately and let it dry fully before closing the laptop. A dirty keyboard can transfer grime back to the screen when closed.
Nicotine Film or Long-Term Haze
If someone smokes near the laptop, a thin film can build over time. It can look like a gray or yellow cast.
For this:
– Start with the usual method: distilled water and microfiber.
– If that is not enough, use a cleaner that is clearly marked as safe for LCD and LED screens. Follow the same cloth-first rule.
– Use more passes with very light pressure, rather than strong pressure.
Some long-term haze may never fully disappear if coatings have aged or were damaged before. You can improve clarity, but not restore the screen to new condition in every case.
Stubborn Streaks After Cleaning
If you see streaks that only appear when the screen turns on:
– You might have left too much cleaner on the surface.
– Or the cloth was not clean and left residue.
To fix this:
– Take a fresh, dry microfiber cloth.
– Very lightly buff in straight lines, across the streak direction.
– Work slowly with light, repeated passes.
If that does not help, try slightly dampening the cloth with just distilled water and buffing again, then drying.
—
How Different Screen Types Change Your Approach
Not all laptop screens are identical. The cleaning principles are the same, but a few details change.
Matte vs Glossy Laptop Screens
Matte screens have a textured, low-glare surface. Glossy screens reflect more light and often feel smoother.
| Screen Type | What To Watch For | Cleaning Notes |
|---|---|---|
| Matte | Coating can be delicate, shows “polished” spots from pressure | Use very light pressure, avoid repeated scrubbing in one area |
| Glossy | Shows fingerprints and streaks easily | Use extra buffing with dry cloth to remove streaks |
With matte screens, pressing hard can create a shinier patch that looks different from the rest of the surface. That is permanent. So if you have a matte screen, be extra careful about pressure.
With glossy screens, the main enemy is streaks. A clean, dry cloth at the end of the process usually solves this.
Touchscreen Laptops
Touchscreens collect fingerprints faster and are built to be interacted with, but they still need care.
Guidelines:
– Clean them more often, with less liquid each time.
– Use the same microfiber and distilled water method.
– Avoid alcohol unless the manufacturer clearly says it is safe. Many phone makers allow light alcohol use; some laptop makers do not.
– Turn off touch capability or shut down before cleaning, or you will trigger random taps.
Touchscreens can sometimes have stronger coatings similar to phones, but do not assume that. Laptop design is less standardized here. When in doubt, follow the gentler method.
Very Old Laptops (Thick Glass Panels)
Older laptops can have thicker glass covers that feel more solid. Some people clean those with almost anything and see no trouble.
Still, there are risks:
– Rubber seals and plastics around the screen may not like harsh cleaners.
– Repeated use of strong chemicals can damage tinted or anti-glare layers.
For older devices that you are not worried about, you can be a bit less conservative. For any laptop you care about, keep the gentle approach anyway. There is little benefit to stronger cleaners when dust and oils respond to water and mild screen cleaner.
—
How Often Should You Clean Your Laptop Screen?
Many people either clean too rarely or too aggressively. A soft middle ground works better.
Guidelines that tend to work:
– Light dusting: once a week or whenever you see dust.
– Fingerprint cleaning: every 1 to 2 weeks for touchscreens or shared devices.
– Deep cleaning for stuck grime: only when needed.
Frequent, very gentle cleanings are safer than waiting months and then scrubbing hard to remove layers of grime. Think of it as upkeep, not rescue missions.
If your screen glass sits very close to the keyboard, keep the keyboard reasonably clean, since dirt can transfer when you close the lid.
—
What To Do If You Already Used the Wrong Cleaner
If you are reading this after spraying glass cleaner directly on your laptop screen, do not panic. Sometimes the damage is minor or reversible.
Here is a simple plan.
Step 1: Stop and Dry It Safely
– Power off the laptop and unplug it.
– Hold the laptop so liquid does not run into the hinge area.
– Use a dry microfiber cloth to gently soak up any visible drops.
– Do not press them around. Blot, lift, and repeat.
Leave the laptop open in a dry place for a few hours or overnight.
Step 2: Check for Lasting Marks
Turn the laptop back on later and look for:
– Irregular cloudy patches that do not match the direction you wiped.
– Stripped-looking areas where the surface appears different.
– Colored blotches or bright patches that change with pressure.
If you only see mild streaks, try cleaning again with distilled water and a clean microfiber. Sometimes you can remove the cleaner residue this way.
If you see obvious coating damage or colored blotches, that part is often permanent. Professional repair may mean replacing the screen panel.
When To Seek Repair Help
Consider repair or professional advice if:
– You see liquid trapped under the glass or in the corners.
– There are new lines, flickers, or spots that follow the liquid path.
– Pressing gently on the casing edges changes the blotches.
Those signs point to liquid intrusion into the display layers, not just surface marks. At that point, home cleaning will not fix it, and more wiping might make it worse.
—
Extra Tips To Keep Your Laptop Screen Clean Longer
The cleanest screen is the one you do not have to touch that often. Small habits can reduce how much cleaning you need.
Simple Habits That Help
Here are some practical ideas that usually pay off:
| Habit | Benefit | How To Apply It |
|---|---|---|
| Avoid touching the screen | Fewer fingerprints and smudges | Use trackpad or mouse; remind guests who use your laptop |
| Do not eat over the keyboard | Less food spray and crumbs | Keep snacks slightly away, especially sauces and drinks |
| Close the lid gently | Prevents keyboard marks on the screen | Check no objects are on the keyboard before closing |
| Use a soft screen protector sheet | Extra barrier against prints and scratches | For some models, you can add removable film, but install carefully |
| Store laptop in a case or sleeve | Less dust buildup | Slip into a sleeve when traveling or not used for days |
None of these are strict rules. They are options. Even adopting one or two of them can cut your cleaning time in half.
—
Quick Reference: Safe Laptop Screen Cleaning Checklist
To keep this practical, here is a short checklist you can follow next time you clean your screen.
Before You Start
– Shut the laptop down.
– Unplug all power and accessories.
– Wait a minute for the screen to cool.
Cleaning Steps
– Remove loose dust with a dry microfiber cloth or light compressed air.
– Lightly moisten a clean microfiber cloth with distilled water or screen cleaner.
– Wipe in gentle, straight strokes across the screen.
– Focus on smudges with repeated light passes, not extra pressure.
– Buff with a second dry microfiber cloth to remove streaks.
What To Avoid
– Do not spray any liquid directly on the screen.
– Do not use household glass or surface cleaners.
– Do not reach for paper towels or rough cloths.
– Do not press hard on the screen.
If you stay inside these boundaries, you are already ahead of many people who damage their screens by trying too hard to make them spotless in one go.
You are not wrong if you thought cleaning a laptop screen should be easy. It is. The hard part is unlearning old habits that worked fine on windows and mirrors. Laptop screens just play by slightly different rules. Once you respect those, the risk of ruining your display while cleaning it becomes very low.