“You do not really need to winterize your sprinklers in Colorado Springs. The snow will insulate the ground, and the system will be fine.”
That claim is false, and it is one of the faster ways to wreck an irrigation system in this area. In Colorado Springs, proper sprinkler winterization is not optional if you want to avoid cracked pipes, broken backflow preventers, and a big repair bill when spring shows up. The short version: you should shut your system off at the right valve, drain or blow out the lines with air, protect the backflow device, and do it before hard freezes set in. Many homeowners handle some of this themselves, but most people rely on a local company for full [Colorado Springs sprinkler winterization](https://www.superiorsystemscolorado.com/).
Let me walk through how this actually works in real yards, not just in theory, and where people tend to get stuck.
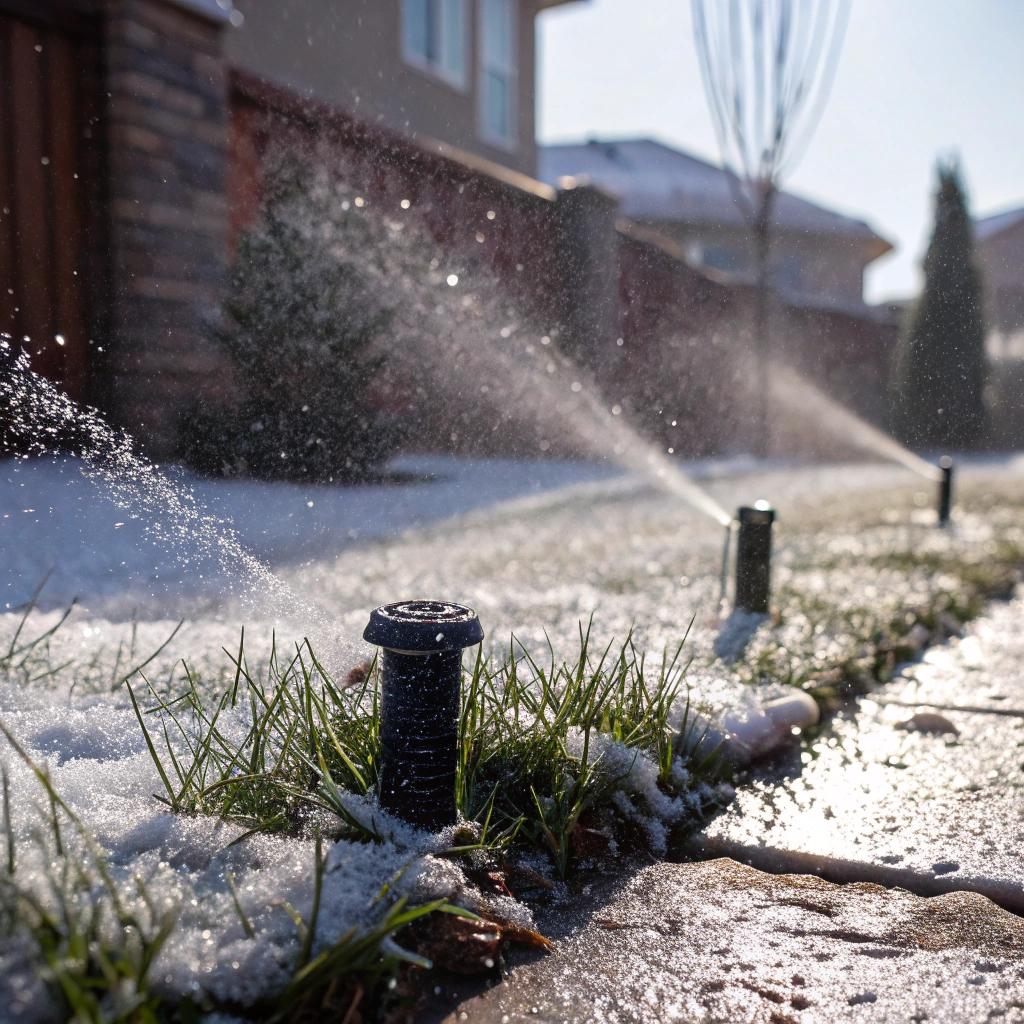
I live along the Front Range, and every year around October I watch the same cycle play out in the neighborhood. The first light frost comes, people scrape car windshields, and someone says, “Oh, I really need to schedule my sprinkler blowout.” A few days later we get a real cold snap at night, and at least one neighbor ends up with a cracked backflow sitting on the side of the house, dripping all over the siding. It is almost predictable.
So if you are trying to avoid that, the logic is simple. Sprinkler systems hold water in low spots in the yard, even when you shut the controller off. That water expands when it freezes. Dirt can move a little to absorb the pressure. Plastic and copper do not move as much. Something gives, but you do not see the damage until months later when you run the system again.
The goal of winterization is to get as much water as possible out of every part of the system before the deep freezes hit, and to shut everything down in a way you can reverse easily in spring.
That sounds straightforward, but the exact steps can feel confusing if you have never done it before. Colorado Springs has a mix of older and newer neighborhoods, with different water providers and slightly different plumbing setups. Some homes have manual valves in a pit, some have everything in the basement, some have tricky backflow layouts.
Let us break it into pieces and go through what actually matters.
Why winterization matters so much in Colorado Springs
Colorado Springs has a strange mix of weather for irrigation. The air is dry. The sun can be strong. Yet winter nights drop well below freezing, and we get sudden temperature swings.
A lot of people make two wrong assumptions:
1. “It is a dry climate, so pipes will dry out on their own.”
2. “I turned the controller off, so the system is empty.”
Both are off.
Your sprinkler lines sit below grade, where it is shaded and cooler. Water sits in low areas of pipe, valve bodies, heads, and the backflow assembly. Dry air above ground does not pull that water out of buried PVC.
Another point that trips people up: our ground in this region can freeze deeper than many think. Some years it is not too bad. Other years, after a long cold stretch, that frost line goes down far enough to reach shallow pipes near walkways or driveway edges.
So even if you only had a mild winter last year and “nothing happened,” that does not say much about what will happen this year.
One cheap winterization visit almost always costs less than repairing a single cracked backflow preventer or replacing a set of broken valves in spring.
That is not marketing talk. Just call around for prices on a new pressure vacuum breaker or a full manifold repair and compare that to a one-time fall service.
Quick overview of what a sprinkler system has to survive in winter
Before you look at each step, it helps to know what parts of the system you are protecting. Your setup might not match this perfectly, but most residential yards in Colorado Springs have something close to this:
| Component | Where it is | Why winterization matters |
|---|---|---|
| Main shutoff valve | Basement, crawlspace, or meter pit | Controls water supply to the entire sprinkler system |
| Backflow preventer (PVB or RP) | On exterior wall or in a box above ground | Most common part to crack from freezing water |
| Zone valves / manifold | Valve box in yard, sometimes near front walk | Holds water in small pockets that can freeze |
| Lateral lines | Buried pipe running to each sprinkler head | Traps water in low points across the yard |
| Sprinkler heads | At soil level in turf and beds | Can crack, clog, or blow seals if full of ice |
| Controller / timer | Garage, basement, or outside wall | Needs to be turned off correctly, sometimes set to “off” or “rain” |
Each part responds a bit differently to cold. The backflow sits above ground, so it sees harsh conditions first. Valves and lateral lines are somewhat protected underground, but once the frost creeps down, they are not safe either.
So the whole process you read about “blowing out sprinklers” is really about giving these parts some relief from the freeze cycle.
When should you winterize sprinklers in Colorado Springs?
This timing question comes up every year, and people always hope for a single, perfect date. It is not that clean.
As a rough guide, Colorado Springs homeowners should usually schedule winterization sometime between late September and late October. Some years you can go into early November, but that starts to feel like you are gambling with the forecast.
Here is how I personally think about it:
If overnight lows are dipping into the mid 20s, repeatedly, and long term forecasts show more of that, it is time. The first light freeze that just hits the top of the grass is not your deadline, but it is a warning.
You might be thinking, “But my yard still needs water then.” That is fair. Turf in this region does well when it goes into winter with moist soil. Completely shutting off irrigation too early can stress the grass and some shrubs.
So there is a balance:
– Do not shut down so early that your yard goes bone dry while it is still warm.
– Do not push so late that you are sitting through hard freezes with water in your lines.
Many homeowners water deeper and less often in late September, then schedule winterization in the first half of October. After that, if we get long dry spells in winter, you can spot water by hand or use a hose on warmer days.
Basic winterization steps, in plain language
I will go through the core process now. Some people do parts of this themselves, some hand the whole thing off. I am not trying to talk you into one or the other, just explain what actually needs to happen.
1. Turn off the irrigation water supply
Your sprinkler system has its own shutoff valve on the main water line. It might be:
– In the basement, on a line that runs to the wall where the backflow sits
– In a crawlspace
– In an underground box near the street, before the backflow
Look for a valve with a handle that is in line with the pipe when it is open. To shut it off, turn the handle 90 degrees so it is across the pipe.
When you turn this, you are not just turning off the controller. You are cutting water to the entire sprinkler loop so it cannot refill while you are trying to empty it.
Some shutoff valves also have a small drain below them. If you see that, you can open it briefly to drain the short section of pipe between that valve and the outdoor line.
2. Power down or pause the controller
Turning off the water is not enough. The controller still thinks it should run zones on schedule.
Most modern controllers have an “off” or “rain” setting. Turn the dial to that position. That way, if someone in the family pushes buttons later, the system will not accidentally start and run dry zones.
If your controller has a backup battery, you can leave it. You just want the station programming paused, not erased.
3. Protect the backflow preventer
Backflow preventers in Colorado Springs are usually pressure vacuum breakers (PVBs). They sit above ground, often right next to the house, and they have test cocks and a valve handle.
These are the parts I see cracked the most after a freeze. So they get special attention.
For most PVB setups, the main steps are:
– Shut off the isolation valves on the backflow (turn the small handles a quarter turn so they are perpendicular to the pipe).
– Open the test cocks with a screwdriver so trapped water can drain.
– If there are drain plugs or small caps, remove them for a moment so water can escape, then place them back loosely.
Once the water is out, many homeowners wrap the backflow with insulation or a purpose-built cover. You can use foam covers, old towels inside a plastic bag, or a commercial insulated bag. Just avoid trapping moisture directly on the metal surface where it will stay wet all winter.
One small but real mistake: people turn the PVB handles back to a half-open position for winter. That can be fine, but if you forget how you left them, it can complicate spring startup. I like to take a quick photo when everything is in winter mode so you have a reference later.
4. Get the water out of the lines
This is where the phrase “sprinkler blowout” comes from.
There are three common ways to clear lines:
– Manual drain valves in low spots
– Automatic drain valves that open when pressure drops
– Forced air blowout using an air compressor
In newer systems around Colorado Springs, installers often rely on blowouts, because the ground is sloped and low spots are hard to predict.
Manual and automatic drains
If your system has manual drain valves, they will be in small boxes or at the bottom of low sections in the yard. Opening those after you shut off the main supply can remove a lot of water without any air compressor.
Automatic drains are small fittings that open when pressure drops and close when pressure resumes. They help a bit, but they rarely clear an entire zone on their own. So if someone tells you, “My system drains itself,” I would take that with some skepticism.
Air compressor blowout
This is the part many homeowners are not comfortable doing themselves, and I understand why. You need the right compressor, the correct fitting, and you can damage components if you use too much air pressure.
The general steps look like this:
1. Connect an air compressor to the blowout port on the sprinkler line, usually near the backflow or in a valve box.
2. Set the compressor to a safe working pressure. For most PVC residential systems, that means staying in the range of about 50 to 60 psi, sometimes less.
3. Run one zone at a time from the controller while slowly feeding air into the system.
4. Watch the heads. At first you get a mix of water and air, then mostly mist, then just air. Once you see only air for a bit, move to the next zone.
The idea is to keep moving. You are not trying to sandblast your pipes; you just want enough air to push most of the water out.
It can be tempting to skip this if you have automatic drains, but in our freeze-thaw cycles, that is risky. A small amount of water left in an elbow or valve body can still cause trouble.
DIY vs professional winterization in Colorado Springs
People often ask if they should handle all of this themselves or hire someone.
There is no single right answer, but here are some questions that might help you decide.
Questions to ask yourself
– Do you know where all your valves, drains, and backflow parts are?
– Are you comfortable working around pressurized water and air?
– Do you already own a suitable air compressor, or would you need to rent one?
– Are you okay with the small chance that you miss something and have a repair bill in spring?
If you understand your system and just need a reminder each fall, you may be fine doing most of the work yourself, especially shutting off water and opening drains. Some people even hire a company only for the air blowout portion and handle the rest.
If your system layout is confusing, or if you inherited the house and do not know how the previous owner ran things, hiring a local irrigation company for a full winterization visit is usually safer.
A decent technician will not only blow out the lines, but also point out damaged heads, leaking valves, or code issues with your backflow. That short visit can save you guesswork later.
Common winterization mistakes in Colorado Springs yards
Over the years, certain patterns repeat. You might recognize one of these from your neighbors, or from your own experience.
Just turning the controller off and walking away
This is probably the biggest one. People think “off” on the controller equals “safe” for winter.
It does not. Water still sits in the system. If you do nothing else, you are trusting that every winter will be gentle. That is not how our area works.
Ignoring the backflow preventer
I still see backflows fully exposed, metal shining in the cold, not drained, no cover. It might survive for a couple of years. Then one morning someone notices a crack in the side and a thin spray of water.
These devices are required to protect your drinking water from contamination, so repairing them is not optional. That makes them a priority for winter prep.
Using too much air pressure during blowout
This one is more on the DIY side.
Some people borrow a high-pressure compressor that is meant for larger work, hook it up, and think that “more pressure equals better blowout.” Heads start chattering and jumping around. Seals get stressed. In the worst cases, fittings break underground.
A careful blowout uses moderate pressure and enough time, not brute force.
Waiting for the first major freeze to take action
Our weather can shift fast. A forecast of “lows around 32” can suddenly turn into a night in the low 20s. If your system is still full, that can be enough to damage exposed parts.
It is better to plan winterization for a certain week, with a bit of margin, instead of reacting to the first cold night.
Forgetting to disconnect hoses and drip filters
Many yards have a mix of spray heads and drip zones. Those drip sections often have small filters, pressure reducers, or above-ground tubing that can hold water.
It is easy to forget those pieces because they do not look like typical sprinklers. They still need attention. Filters and pressure reducers can crack, and drip lines can split.
Special things to watch for in Colorado Springs systems
Not every city has the same irrigation habits. Colorado Springs has a few quirks.
City water vs well systems
Some homes, especially on the edges of town, use private wells for irrigation. That slightly changes how winterization works.
With city water:
– You have a meter and a main shutoff that feeds both the home and the sprinkler system.
– The backflow is mandatory and regulated.
With well systems:
– There may be a separate pump to shut down or protect.
– The system might be more custom, so valves and drains can be in odd spots.
If you are not sure what you have, look at your water bill. If irrigation usage is listed separately, or if you see references to non-potable water, that can also influence how the lines are laid out and what kind of backflow is present.
Sloped yards and terraced areas
Many Colorado Springs yards have some grade changes. Water in pipes will naturally settle in low sections.
On a sloped yard, you might have:
– More low pockets that hold water
– Zone lines that cross retaining walls or steps
That means blowout becomes more important. Manual drains alone may not be enough, because water can hide in pipe loops behind walls or under sidewalks.
What about drip irrigation and garden beds?
Drip systems are common here because of water restrictions and the desire to target plants more precisely. People sometimes think drip lines are “safe” in winter because there is less water in them.
It is not quite that simple.
Drip tubing and emitters
Flexible drip tubing holds less water volume than PVC, but it still holds some. In shallow installations, or where tubing comes above ground, that water can freeze.
Here are a few simple steps:
– Make sure drip zones are included in the blowout process, just like regular zones.
– Check filters and pressure regulators for drain plugs. Remove, drain, and reassemble them.
– If any drip tubing is exposed above ground, especially on rock beds, consider covering it lightly or moving it just under the mulch layer.
Raised beds and seasonal plantings
If you run drip lines into raised vegetable beds or seasonal planters, it may be easier to disconnect those small lines before winter. Coil them, store them in the garage, and reconnect in spring.
It is a bit more work now, but it prevents small plastic fittings from cracking when the beds freeze and thaw.
What about winter watering in Colorado Springs?
This part often feels contradictory. Everyone says “turn off your sprinklers,” and then you hear that you should “water your lawn in winter.”
Both can be true.
Your automatic system should be winterized so the buried pipes and valves avoid damage. At the same time, during long dry stretches, a little water helps keep turf and shrubs alive.
So what do you do?
Many homeowners:
– Use a regular hose and a sprinkler on a warm afternoon every 3 to 4 weeks if we have had no moisture.
– Shut the hose off, disconnect it from outdoor faucets, and let those faucets drain again so they do not freeze.
It is a bit of manual work, but it avoids running the whole irrigation system just to get a small amount of water onto the yard. The underground pipes remain dry, and you still support the landscape.
Signs in spring that winterization went wrong
Sometimes you only find out months later that something was missed. When you first restart the system in spring, watch for these clues:
Visible leaks at the backflow
When you turn the water back on:
– Check the backflow assembly carefully.
– Look for hairline cracks, dripping test cocks, or wet spots on the wall.
A small drip here can waste a lot of water over a watering season, and it can also damage siding.
Zones that never build pressure
If a zone runs but sprinkler heads never pop up properly, and you see soggy ground in one area, you may have a cracked pipe.
Sometimes the break is in a valve box, easy to see. Other times it is in the middle of a run, and you only notice a constant wet area.
Heads that sputter or spray oddly
A winter crack does not always fully break a head. It can change the spray pattern, reduce range, or send water in erratic directions.
When you first run each zone, walk the yard. Look for:
– Heads that do not pop up all the way
– Nozzles spraying in strange arcs
– Geysers where a head body has broken off
Fixing those issues early in the season keeps your coverage even and prevents wasted water.
Planning your winterization routine each year
It might feel like winterization is complicated, but once you go through a full cycle, you can build a simple routine that repeats each fall.
Here is one basic pattern that works for many Colorado Springs homeowners:
Early fall: prep and inspection
– Check your controller programming and adjust watering for cooler weather.
– Inspect your backflow for any existing leaks or rust.
– Open a couple of valve boxes and look for standing water or obvious breaks.
Mid fall: schedule winterization
– Pick a target week in late September or early to mid October.
– If you are using a professional company, schedule well in advance. Their calendars fill quickly once the first frost is in the forecast.
– Decide what you will do yourself versus what they will handle.
Winter: light monitoring and occasional watering
– After the system is winterized, double check that the controller is off and that the main irrigation valve is closed.
– Make sure the backflow cover stays in place during wind storms.
– If we go 3 to 4 weeks with no moisture and ground is dry, water manually on a warm day using a hose.
Early spring: careful restart
– Do not rush to open the system at the first warm spell. We still get late freezes.
– When you are ready, open the main irrigation valve slowly while someone watches the backflow.
– Run each zone one by one and look for leaks or odd spray patterns.
The point is to treat winterization and spring startup as two bookends of the same process. When you plan both sides, the whole system usually behaves better.
Frequently asked questions about Colorado Springs sprinkler winterization
Can I skip blowout if I drain everything manually?
You can reduce risk that way, but it is hard to be sure all low spots are empty. In many modern systems with complex layouts, a proper air blowout is still safer. Manual drains help, though, especially on older lines.
Is it ever “too late” in the season to winterize?
If your system is still full and the forecast shows several nights in the low 20s or colder, you may already have some damage. That said, it is almost always better to winterize late than not at all. You can prevent further issues for the rest of the season.
Do I need to winterize if I have a “frost-free” system?
Some marketing terms make it sound like systems can survive freezing without prep. In Colorado Springs, with our real freezes, you should still shut off water and clear lines. “Frost-free” hose bibs or parts do not mean the whole irrigation network is safe.
What air compressor size do I need for a DIY blowout?
Most small portable compressors struggle to keep up with large yards. Many professionals use larger tow-behind or high-volume units, but that is more than most homeowners want to own. If you plan to do it yourself, you need a compressor that can supply moderate pressure and enough air volume to push water out steadily, not in tiny bursts. If you are not sure your equipment can handle that, hiring help for this part can be the smarter choice.
How long does a typical winterization visit take?
For an average Colorado Springs yard, a professional often finishes in 30 to 60 minutes. Very large or complex systems take longer, especially if there are multiple backflows, drip zones, or tricky access points.
Is winterization really worth it if I had no problems last year?
That is the question many people ask right before they have their first break. One gentle winter without issues does not guarantee the next one will be as kind. The cost of a single break in a backflow or a deep valve manifold often exceeds several years of regular winterization visits. So from a simple budget angle, it tends to pay off.
If you walked through your yard right now, could you point to every valve, drain, and backflow part you would need to touch before the next hard freeze?