“Japan is too expensive, too crowded, and too confusing for a first-time traveler.”
That line gets repeated a lot, and it keeps many people from booking a ticket. It is only half true. Japan can be expensive, and the crowds can be intense, but with a few smart choices you can keep your daily costs sane, move around calmly, and still have a rich experience. That is exactly what I want to break down here, the kind of step-by-step, real-world approach I share on Sunday Best Blog when I write about trips that feel special without feeling stressful.
I might be wrong, but most travel advice about Japan swings to extremes. Either it is “budget backpacker mode” or it is “five-star hotel with a private driver and a tasting menu every night.” Most travelers I talk to sit in the middle. They want to eat well, stay somewhere clean and comfortable, see the highlights, and still feel like they are seeing a side of Japan that is not just the same five Instagram spots.
This is where a calm, practical plan helps. Not a huge spreadsheet. Just clear choices: when to go, how to move, what to skip, what to say yes to, and how to behave so you do not feel lost or rude. I will walk through these pieces, from landing at the airport all the way to leaving with photos you will actually care about and stories that go deeper than “we saw a big crossing.”
“You need at least two weeks in Japan or it is not worth it.”
That is simply not accurate. If you only have five or six days, you can still have a strong, satisfying trip if you narrow your focus and stop trying to “see everything.” On the other hand, three or four weeks can feel scattered if you do not give your days a simple spine. Time helps, but clarity helps more.
So let us look at the key choices that make a Japan trip smoother, cheaper, and a lot more relaxed, even for a first-timer.
When to visit Japan without losing your mind (or your budget)
“You have to visit during cherry blossom season or you are missing the real Japan.”
Sakura season is beautiful. It is also packed, expensive, and full of half-bloomed trees if your timing is off by a few days. I would not plan your entire trip around a flower that may or may not show up for you.
I might be wrong, but I see three main seasons that make sense for most travelers. Each has pros and tradeoffs. Here is a quick view, then I will unpack it.
| Season | Rough Months | Pros | Tradeoffs |
|---|---|---|---|
| Late March to mid April (Sakura) | Mar 20 – Apr 15 | Blossoms, mild temps, festivals | Crowds, higher prices, booked hotels |
| Late October to late November (Autumn) | Oct 20 – Nov 30 | Colorful leaves, clear air, calmer vibe | Busy on weekends in popular spots |
| Shoulder months | May, early June, early December | Fewer crowds, lower prices | Less dramatic scenery, some rain or cold |
If you want one simple guideline: visit during the shoulder months unless you are deeply attached to blossoms or autumn leaves. Flights often cost less, hotels are easier to book, and popular areas like Kyoto and Tokyo feel more manageable.
A quick set of watch-outs:
– Golden Week (late April to early May): domestic travel spikes, trains and hotels fill.
– Obon (mid August): busy, hot, humid, with crowded hometown travel.
– New Year period: many places close, trains are packed, and big cities feel quieter than usual.
I am not saying those periods are bad. They just need stronger planning and more patience. If this is your first trip, give yourself the gift of quieter streets and easier reservations.
Where to go on your first trip to Japan
“You have to visit Tokyo, Kyoto, and Osaka or you have not really seen Japan.”
This is one of those ideas that sounds reasonable but pushes people into a rushed loop: land in Tokyo, sprint through Kyoto, squeeze Osaka, and then collapse on the flight home. If that is your style, fine. If not, you can cut one city, or even focus on a single region, and still have a rich trip.
The classic Tokyo-Kyoto (-Osaka) route
If it is your first time, this path still works well. You see old and new, food, shrines, and city streets. Here is a simple structure many travel bloggers use and refine over time:
| Trip Length | Sample Split | Notes |
|---|---|---|
| 6-7 days | Tokyo 4, Kyoto 2-3 | Skip Osaka or do a short evening stop |
| 10 days | Tokyo 5, Kyoto 3, Osaka 2 | Osaka as base for food and day trips |
| 14+ days | Tokyo 5, Kyoto 4, Osaka 2, 3 days side trips | Add places like Nara, Hakone, Kanazawa |
If you feel pulled in many directions, choose two bases and stop there. For example, Tokyo and Kyoto only. From Tokyo you can day trip to Nikko, Kamakura, Yokohama. From Kyoto you can reach Osaka, Nara, and some rural spots.
Alternative first-trip ideas that still make sense
You are not wrong if you want to avoid the standard path. One nice approach is a “Tokyo plus one” plan:
– Tokyo plus Hakone (for hot springs and Mt Fuji views)
– Tokyo plus Kanazawa (for quieter historical streets, gardens, and seafood)
– Tokyo plus Tohoku (Sendai, Aomori) if you want cooler weather and fewer crowds
Or flip it:
– Kansai only: Kyoto, Osaka, Nara, Kobe, maybe Himeji
– Kyushu focus: Fukuoka, Beppu, Kumamoto, Nagasaki
The point is not to switch cities every day. Pick a base, work in day trips, and return to the same bed at night. That one habit makes your trip calmer and ends up saving time and money.
How to get around Japan without getting lost or overspending
“You must buy a Japan Rail Pass or you are wasting money.”
This used to be true for many trips before prices went up. Now, many travel bloggers who track real costs find that individual tickets often cost less, especially for shorter trips focused on one region.
I might be wrong on your specific route, though, so let us walk through the logic instead of copying old advice.
When a rail pass makes sense
If you plan multiple long shinkansen rides in a week or two, a pass can still be useful. For example:
– Tokyo to Kyoto
– Kyoto to Hiroshima
– Hiroshima back to Tokyo
In that case, a 7-day pass sometimes comes close in price to buying those tickets separately, with the bonus of flexibility. On the other hand, if you are doing:
– Tokyo to Kyoto return, and not much else
then single tickets might cost less and keep you on the faster, reserved trains you want.
Here is a simple comparison of the thinking process:
| Travel Style | Good Candidate for Pass? | Reason |
|---|---|---|
| Many long trips in 7-14 days | Often yes | Frequent shinkansen rides add up quickly |
| Tokyo + short day trips only | Usually no | Local trains and buses are cheaper |
| Staying in one region | Look at regional passes | JR East, Kansai passes can be better value |
If numbers are not your thing, there are online calculators that estimate costs for your route. Still, double-check against current prices on the official JR sites. Old blogs are often out of date after fare changes.
Local transport: IC cards, walking, and when to taxi
In Japanese cities, you rarely need cash tickets for each ride. Buy a rechargeable IC card (Suica, PASMO, ICOCA, etc.), tap in and out on trains and buses, and top up as needed.
Three simple habits keep things smooth:
1. Stand on the correct side of escalators. In Tokyo, stand on the left. In Osaka, stand on the right.
2. Move to the sides of doorways when boarding, and let people exit first.
3. Avoid speaking loudly on trains. Many locals treat trains as quiet time.
Taxis are clean and reliable, but not cheap. I usually suggest:
– Use trains and subways for longer moves.
– Use taxis for short hops late at night, with luggage, or in rain when stations are far from your hotel.
Walking is your secret weapon. Many stations sit closer together than you think. A 15-minute walk through a neighborhood can show you small shrines, coffee spots, and parks that you would miss underground.
Where to stay: hotels, ryokan, and realistic comfort
“You have to stay in a traditional ryokan with kaiseki dinner or you are missing the real Japan.”
Ryokan can be special. Tatami floors, hot baths, quiet evenings, a long multi-course dinner. They can also be expensive, rigid with timing, and not that comfortable if you dislike sleeping on futons.
For many travelers, a mix works well: a few nights in modern hotels or apartments, plus one or two nights in a ryokan in a smaller town.
Choosing your base in Tokyo
Tokyo is huge, so your area matters. Here is a simple, honest view.
| Area | Good for | Watch-outs |
|---|---|---|
| Shinjuku | First-timers, nightlife, transit hub | Can feel crowded and bright late at night |
| Shibuya | Younger vibe, shopping, food | Busy, construction in some periods |
| Asakusa | Temples, older feel, quieter evenings | Farther from some modern areas |
| Ginza | Shopping, clean streets, direct airport trains | Less energy late at night, higher prices |
If you are unsure, pick somewhere near a major JR station on the Yamanote Line. It circles central Tokyo and makes movement easier.
Picking a ryokan without overpaying
A few tips more travel bloggers should say clearly:
– One night is enough for most travelers. Enjoy the bath and dinner and sleep, then move on.
– Read recent reviews that mention food and noise. Some spots focus on groups and can feel loud.
– Check dinner and breakfast timing. These can be strict, and missing your slot can mean no meal.
If you want an “on a budget but still with character” stay, look for business hotels near stations in smaller cities like Kanazawa, Matsumoto, or Hiroshima. Clean rooms, friendly staff, and often breakfast, with lower prices than central Tokyo or Kyoto.
Food in Japan: how to eat well without stress
“Ordering food is hard because of the language barrier.”
I hear this a lot, and it keeps people near chain restaurants or international brands. In real life, many Japanese restaurants make ordering easier than you might expect, especially in cities.
There are picture menus, plastic food displays, and vending machines where you press a button, pay, and hand a ticket to the staff. Also, staff in busy areas often know basic English words for menu items.
Simple rules for eating well
Here is a set of habits that I have seen work for many travelers.
1. Follow the line, but not blindly. A short line of locals usually points to a solid meal. A massive line full of tourists near a top attraction often points to social media hype. Balance both.
2. Try one “target” meal a day. That can be ramen, sushi, yakitori, okonomiyaki, or a cafe. For other meals, choose what is nearby and looks decent. This takes pressure off.
3. Look at lunch deals. Many places offer set meals at midday that cost less than dinner for similar quality.
A small table can help you think about cost ranges:
| Meal Type | Typical Price (per person) | Notes |
|---|---|---|
| Convenience store (onigiri, bento) | ¥300 – ¥800 | Cheap, quick, surprisingly good |
| Casual ramen, curry, gyudon | ¥800 – ¥1,200 | Fast, filling, all over cities |
| Mid-range sit-down meal | ¥1,500 – ¥3,000 | Good level for most daily dinners |
| Sushi counter, kaiseki etc. | ¥6,000 and up | Save this for one or two special meals |
One more thing: do not feel forced to chase every famous spot from TV shows or famous YouTube channels. Many have long waits and strict rules. A calm, small neighborhood izakaya can leave a stronger memory than the “most famous” restaurant in town.
Basic food etiquette that helps you fit in
These points help you avoid awkward moments:
– Do not stick chopsticks upright in rice. It resembles a funeral ritual.
– Use the opposite end of chopsticks when taking food from shared plates, if extra utensils are not provided.
– Many places give you a wet towel. Clean your hands, then fold it. Do not use it on your face.
– Pay at the register near the door, not at the table, unless staff indicates otherwise.
You will see some people break these rules. Try your best, and if you make a mistake, just adjust next time rather than stress about it.
Language: how much Japanese do you really need?
I might be wrong, but many travelers overestimate the language barrier in Japan and underestimate the cultural barrier. By that I mean: you can move around with very little Japanese if you understand how things are usually done.
Key phrases that actually help
You do not need long sentences. A few polite words work better than clumsy speeches in English.
| Japanese | Rough Pronunciation | Meaning |
|---|---|---|
| Sumimasen | soo-mee-mah-sen | Excuse me / I’m sorry / Thank you (context) |
| Arigatou gozaimasu | ah-ree-gah-toh go-zai-mas | Thank you (polite) |
| Onegaishimasu | oh-neh-gai-shee-mas | Please (when asking for something) |
| Eigo wa wakarimasu ka? | ay-go wah wah-kah-ree-mas kah | Do you understand English? |
| Kore | koh-reh | This (point at menu or item) |
Pair these with pointing at maps, menu pictures, or translations on your phone. Most interactions become manageable. You will get some puzzled looks from time to time. That is normal.
Using translation apps wisely
Translation apps are helpful, but do not treat them as magic. Some tips:
– Prepare offline downloads of Japanese for times when the signal is weak.
– Keep sentences short and direct, like “Where is this station?” rather than long stories.
– Show the screen instead of trying to pronounce everything if you feel stuck.
Try not to point phones aggressively in people’s faces. Show the screen at a slight angle, with a small bow or nod. Body language often speaks louder than words.
Culture and etiquette: how not to feel like “that” tourist
If you have read a few Japan guides, you have seen long lists of rules. Do not eat while walking. Do not talk on trains. Do not, do not, do not. That can feel heavy.
From what I have seen, three principles cover most situations:
1. Watch what locals do and mirror them.
2. Keep your voice a bit lower than you would at home.
3. Give people personal space.
Still, there are some recurring points that catch visitors off guard.
Temples, shrines, and respectful behavior
When visiting places of worship:
– At the entrance of many shrines you will see a water basin. Rinse one hand, then the other, then pour water in a cupped hand to rinse your mouth (spit beside, not in, the basin). Some people skip the mouth rinse; that is fine if you feel uncomfortable.
– Bow slightly before passing through the main gate.
– Keep your phone on silent and avoid loud conversations or phone calls.
Photography rules vary. If you see a “no photo” sign, follow it. Ask yourself: would I feel okay with someone taking this same photo in a place of worship at home?
Trash, smoking, and small daily habits
Japan has few public trash cans. You will often carry your small trash until you return to your hotel or find a convenience store that allows use of their bin.
Smoking rules surprise many visitors. Some areas have designated smoking rooms or sidewalk corners, while streets themselves may be non-smoking. Watch the ground for markings and signs.
Convenience stores (konbini) like 7-Eleven, Lawson, and FamilyMart are your best ally for daily tasks: ATMs, snacks, drinks, simple meals, and basic toiletries. They seem simple, but they keep many trips running smoothly.
Money, costs, and avoiding common mistakes
Japan is not as cash-only as it used to be, but cash still matters in certain places: small restaurants, older shops, some rural buses. Modern cities accept cards and contactless payments in larger chains and hotels.
How much does a “comfortable” day cost?
Costs vary by city and season, so take these ranges as rough guides, not strict rules.
| Category | Budget Level | Mid Level | Notes |
|---|---|---|---|
| Accommodation (per room) | ¥6,000 – ¥10,000 | ¥12,000 – ¥20,000 | Varies by city and size |
| Food (per person) | ¥2,000 – ¥3,000 | ¥3,000 – ¥6,000 | More if you add fine dining |
| Transport (per person) | ¥800 – ¥1,500 | ¥1,500 – ¥3,000 | Depends on long train rides |
| Sightseeing, extras | ¥1,000 – ¥2,000 | ¥2,000 – ¥4,000 | Temples, museums, small shopping |
You can travel on less if you eat more from convenience stores, stay in hostels, and walk a lot. You can spend much more if you book luxury hotels and premium dining. Most travelers sit between the two.
Common money mistakes to avoid
Here are a few patterns I see:
– Exchanging too much cash at the airport at poor rates.
– Ignoring withdrawal limits and fees on foreign cards.
– Forgetting that some rural ATMs do not accept foreign cards.
A simple pattern that works for many:
– Use a no-foreign-fee card for larger charges like hotels and some meals.
– Withdraw moderate amounts of cash from ATMs at 7-Eleven, Japan Post, or major banks when needed.
– Keep cash split in more than one place in your bags, in case of loss.
Itineraries that feel human, not rushed
I might be wrong, but most first-time Japan itineraries try to cram too much into each day. People list sixteen shrines, dozen restaurants, ten shopping streets, and a couple of day trips. On the ground, that feels like a race.
Instead, think of each day in three blocks: morning, afternoon, and evening. Give each block a main focus and one backup option nearby. That is it.
Sample 7-day first trip: Tokyo and Kyoto
Here is a simple plan that leaves room for rest.
| Day | Base | Main Focus | Backup Idea |
|---|---|---|---|
| 1 | Tokyo | Arrive, check-in, explore area near hotel | Early night walk to nearby shrine |
| 2 | Tokyo | Asakusa & Senso-ji, Sumida River area | Skytree or a small museum |
| 3 | Tokyo | Shibuya, Harajuku, Meiji Shrine | Omotesando for cafes and shops |
| 4 | Tokyo | Day trip (Nikko, Kamakura, or Yokohama) | Stay in city and visit Ueno/parks |
| 5 | Kyoto | Travel to Kyoto, check-in, Gion walk | Small temple near hotel |
| 6 | Kyoto | Fushimi Inari early, then Nara or central Kyoto | Sake tasting in Fushimi area |
| 7 | Kyoto | Arashiyama early, slow afternoon, depart or return | Skip one area if tired |
Notice what is missing: endless nightlife hopping, distant side trips every day, and strict hourly scheduling. When you cut all that, you can adjust to weather, energy levels, and random finds on the street.
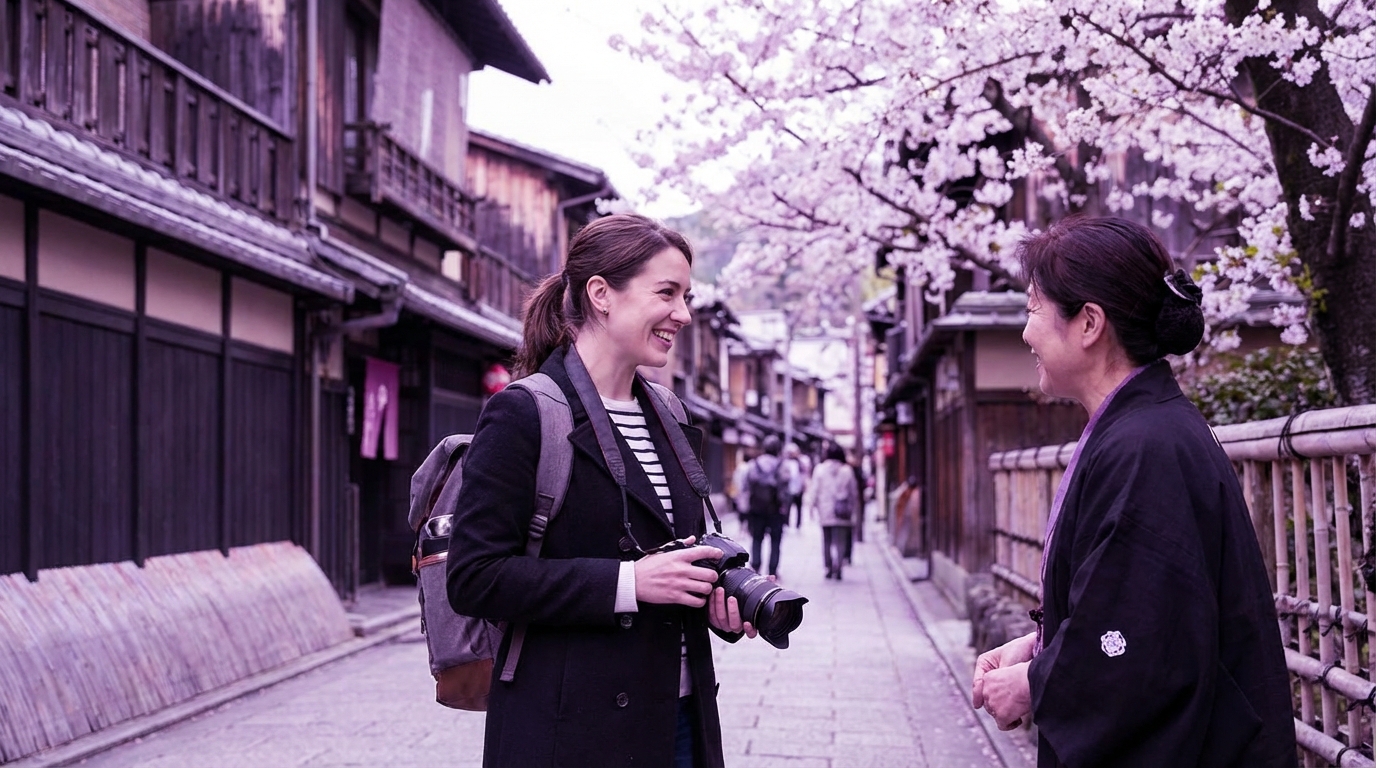
Photography and social media without losing the real trip
Many travelers arrive with a mental list of “must shoot” spots: Shibuya Crossing, Fushimi Inari, Arashiyama Bamboo Grove, TeamLab shows, certain cafes and desserts. Those spots can be worth seeing, but they can also take more time than they give back, especially at peak hours.
A different way to think about photos in Japan:
– Pick a few “postcard” shots you care about and plan them early in the day.
– Let the rest of your photos be small details and quieter scenes.
Some of my favorite images from different trips are not of the big gates or crossings. They are of empty side streets before shops open, old bicycles near shrines, and neon signs reflected in puddles after light rain. You cannot always plan those. You can only leave space for them.
Staying connected: internet, apps, and digital habits
You can travel around Japan without constant internet, but having a connection helps with navigation, translation, and train times.
Common choices:
– SIM card: for unlocked phones, with local data.
– Pocket Wi-Fi: useful for groups or if your phone is locked.
Downloaded tools that help:
– Offline maps for key cities.
– Train apps for schedules and platforms.
– A basic notes app where you keep hotel addresses in Japanese and English.
Try not to spend your whole trip glued to your phone. Check directions, then put it away for blocks at a time. Watch how people live, the small routines at stations, kids walking to school, office workers lining up for lunch. Those memories rarely fit in a screen.
Planning mindset: how travel bloggers refine their Japan trips
After several visits, many travel bloggers adjust how they think about Japan. They move away from collections of “musts” and towards patterns that work for them. You can borrow that mindset on your very first trip.
Some patterns that tend to work:
– Repeat some places at different times of day. A shrine at 7 a.m. does not feel like the same place at 2 p.m.
– Accept that you will miss things. That is not failure. It is a sign that there is more for a next time.
– Build small rituals: the same bakery near your hotel in the morning, the same convenience store stop before bed, the same walk home from the station.
If your goal is to “check off Japan,” you might leave tired and a little numb. If your goal is to have a clear, honest first trip that fits your time and budget, you will carry better stories home.
And if some advice you read here does not fit your style, change it. Your trip does not have to look like a polished video or someone else’s dream plan. It only needs to feel right for you, one train ride, one bowl of ramen, one quiet street at a time.