“Babies do not need much. You can just figure it out once they arrive.”
That quote sounds comforting. It is also the reason many new parents feel overwhelmed, exhausted, and stressed in the first weeks at home. You do not need a perfect home or every product in the store, but you do need a plan. Preparing your home before your newborn arrives does not remove all stress, yet it cuts a big chunk of it. Think of this as clearing roadblocks so you can focus on feeding, healing, and bonding.
I might be wrong, but I have seen a pattern: the parents who prepare the environment ahead of time usually feel more calm. They still feel tired, they still have long nights, but their home helps them instead of fighting them. This is what “preparing your home” is about. Not a magazine nursery. A place that works when you are half-asleep at 3 a.m.
There are 14 key areas that tend to matter most. Some are obvious, like setting up a safe sleep space. Others are less obvious, like planning where dirty laundry will pile up or how you will move around at night without waking everyone.
I want to walk through these areas in detail, but keep one rule in mind: take only what actually fits your life. If something sounds wrong for your situation, skip it. You are not collecting gold stars here; you are building a home that works for your family.
“If I just buy the right stroller and crib, the rest will fall into place.”
That statement misses a big piece. Products help, but systems matter more. Where will you change diapers during the day? Who puts bottles together at night? Where does the baby go when you need both hands free to cook or shower? These are questions about layout and routine, not just shopping.
Let us walk through the practical setup one area at a time, keeping the focus on real life: sleep, feeding, hygiene, safety, and your own sanity.
1. Set up a safe, simple sleep space
Newborn sleep can feel confusing, but the physical setup is straightforward.
At the core, you want a flat, firm surface, no loose items, and a place that works day and night.
“A cute, decorated crib with pillows and toys makes the baby feel cozy.”
That idea is common, and it is not safe. For safe sleep, you strip it down: no pillows, no crib bumpers, no stuffed toys, no loose blankets.
Key elements of a newborn sleep area
Here is a quick view of what matters for the main sleep spot:
| Element | What it means | Reason it helps |
|---|---|---|
| Firm mattress | Crib or bassinet mattress that does not sink in | Lowers suffocation risk and supports posture |
| Fitted sheet only | Snug sheet, no loose fabric | Nothing loose covering baby’s face |
| No extras in bed | No pillows, toys, blankets, bumpers | Reduces risk of entrapment and overheating |
| Room-sharing setup | Baby sleeps in same room, separate surface | Makes night feeds easier and safer |
It seems to me the best move is to pick one main sleep space for nights (crib or bassinet near your bed) and then a flexible space for daytime naps, such as a crib in the nursery or a bassinet in the living room.
A common mistake is setting up only the nursery, far from your bed. Those midnight walks across the house get old very fast. If possible, bring the sleep space into your bedroom for the first months.
2. Prepare a night-time “survival zone”
You are going to spend a lot of time awake when the rest of the world is quiet. Planning for those hours is one of the most practical things you can do.
Think of a “night station” next to your bed or next to the baby’s. You want the things you reach for without thinking.
“As long as the baby has a crib, nights will sort themselves out.”
Nights usually feel chaotic without some structure. You do not need a strict schedule, but you do need your tools close.
What to keep in your night zone
| Item | Why it helps at night | Extra notes |
|---|---|---|
| Soft night light | Enough light to see, not enough to wake everyone up fully | Avoid bright ceiling lights |
| Water bottle & snacks | Feeding makes you thirsty and hungry | Think nuts, crackers, fruit bars |
| Diaper basics | Diapers, wipes, cream, small trash bag | So you do not walk to another room at 2 a.m. |
| Burp cloths | Catch spit up without changing full outfits | Keep several within reach |
| Phone charger / clock | Track time or feeding if you want | Do not scroll endlessly if you can help it |
If you are breastfeeding, you will also want nursing pads, nipple cream, and maybe a small pillow to support your arm. If you are bottle feeding, your prep will be a bit different, which we will cover later.
The main idea: anything you stand up to fetch more than once in a night probably belongs in your night zone.
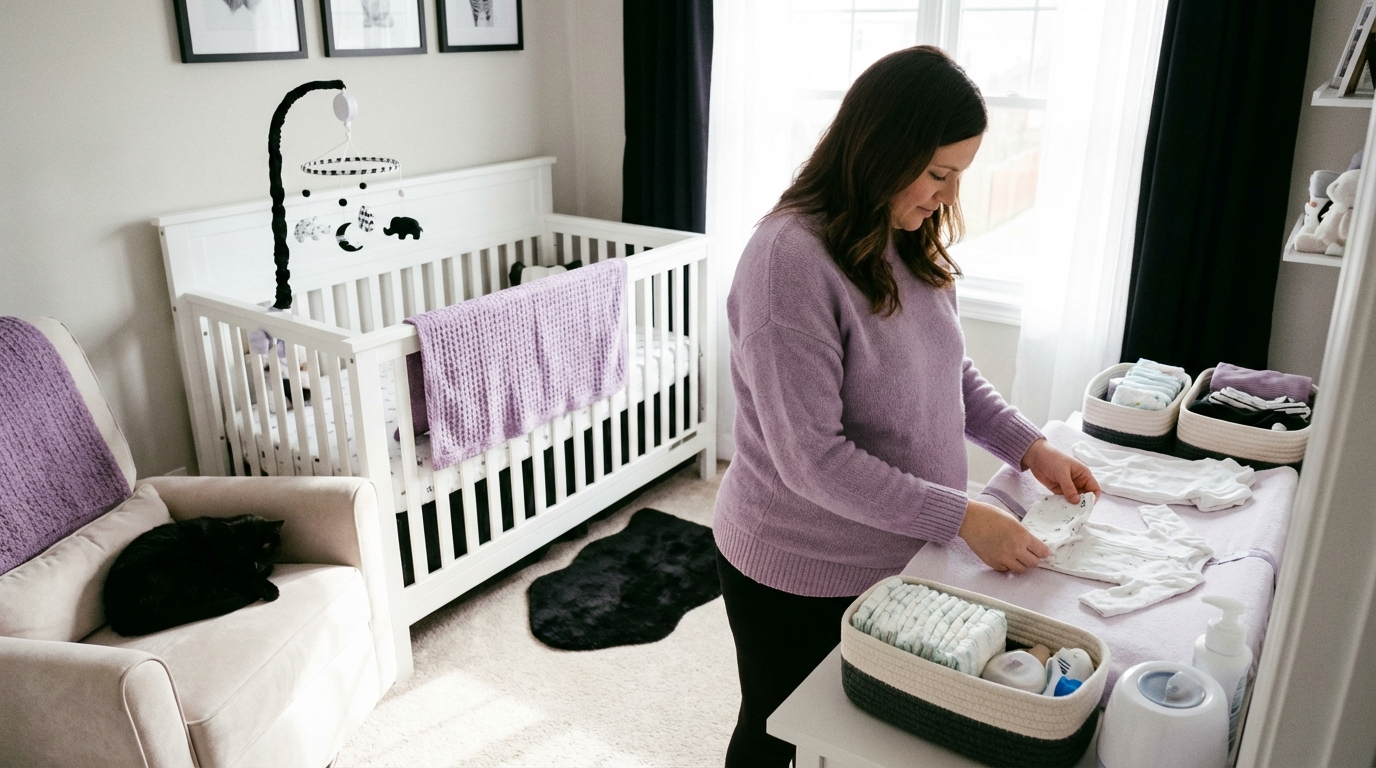
3. Create safe, convenient diaper changing spots
Babies need many diaper changes. You can change a diaper on any safe, flat surface, but life is easier if you plan a few stations in advance.
I might be wrong, but having only one changing table for the entire home creates a lot of back-and-forth walking. That can be hard if you are sore, recovering from a birth, or caring for other children.
The main changing station
Your main station can be a dedicated changing table, a dresser with a changing pad on top, or even a sturdy table. The label does not matter much. Safety and reach do.
Key points for the main spot:
| Area | What to arrange | Why it matters |
|---|---|---|
| Surface | Stable, at a height that is comfortable for your back | Prevents falls and reduces strain |
| Supplies | Diapers, wipes, diaper cream, spare clothes, trash bin | Everything in arm’s reach so you never leave baby unattended |
| Safety | Always keep one hand on baby; use safety straps if available | Babies can roll suddenly |
Secondary “grab and go” kits
It helps to keep a small basket or caddy in other rooms where you spend time. For example, a kit in the living room and one in your bedroom.
Each kit can have:
– A few diapers
– A travel wipe pack
– A small tube of cream
– A thin changing mat or towel
This way you are not climbing stairs every time your baby is wet.
4. Arrange your feeding setup (breast, bottle, or both)
Feeding is where parents often feel the most pressure and judgment. Ignore opinions for a moment and focus on logistics. No matter how you feed, you will do it many times a day. Your home should make that easier, not harder.
“Feeding is natural. You do not have to prepare; you will just figure it out.”
There is some truth in that your body and baby will learn together, but the physical setup matters more than people say. You are going to sit in certain places for long stretches. Setting those spots up well is a big gain.
If you plan to breastfeed
Think about where you will usually nurse: your bed, a chair in the nursery, the couch, or a mix.
Set up a “nursing nest” with:
| Item | Purpose | Notes |
|---|---|---|
| Supportive chair or spot | Helps you sit without hunching over | Arm support helps your shoulders |
| Pillow or nursing pillow | Supports baby at breast height | Reduces strain on back and arms |
| Water & snacks | Hydration and energy during long feeds | Keep them replenished daily |
| Nursing pads | Prevent leaks through clothing | Reusable or disposable |
| Light blanket or cardigan | Temperature control for you | Helps during night chills |
If you pump, you will also want a spot near an outlet, a small table for the pump, and a storage plan for milk (fridge space, containers or bags, labels).
If you plan to use formula or bottles
Bottle feeding has its own set of steps: preparing, feeding, washing, and storing.
Try creating a clear “bottle station” in the kitchen:
| Component | Setup idea | Benefit |
|---|---|---|
| Clean area | One part of the counter for bottle prep only | Keeps process clear and hygienic |
| Drying rack | Small rack or mat only for baby items | Keeps parts organized and visible |
| Storage | Bin or drawer for clean bottles and nipples | Reduces last-minute searching |
| Formula spot (if using) | Formula containers, scoop, and measuring tools | Helps consistency with mixing |
At night, consider a separate night bottle setup, especially if your bedroom is far from the kitchen. Some parents prepare pre-measured formula and water, or pre-made bottles stored in a small cooler near the bed and warmed quickly.
Regardless of method, agree with your partner (if you have one) on who does which steps: washing, preparing, feeding, tracking supplies. Vague roles often create tension once you are both exhausted.
5. Baby-proof the essentials, not the entire home yet
You do not need to pad every corner before your newborn arrives. They are not crawling on day one. Still, there are a few safety steps that make sense early.
“Baby-proofing is for later. Newborns do not really move.”
They do not move much at first, but plans have a way of slipping. Once the baby starts rolling, you will be busy with many other things. Some safety work is easier now.
Early safety checks that matter before birth
Focus on:
| Area | What to check | Why it helps |
|---|---|---|
| Sleep area | Crib or bassinet meets safety standards, no loose cords nearby | Reduces risk around baby’s main rest spot |
| Electrical cords | No cords hanging near floor where baby might later grab | Prevents pulling lamps or devices down |
| Heavy furniture | Secure tall dressers or shelves to wall | Prevents tipping risks as baby grows |
| Smoke & CO alarms | Check batteries and placement | Basic safety for the whole family |
| Medications & chemicals | Store high or in locked cabinets | Safer long term when baby starts moving |
You can add outlet covers, cabinet locks, and gate planning in a few months, once life with the baby feels a bit more settled.
6. Set up a simple baby clothes system
Clothes are a quiet stress source. Tiny items, frequent changes, constant laundry. A bit of organization helps a lot.
I have seen parents overcomplicate this with too many sizes and outfits on display. Then they reach for something cute that does not fit, or they miss the clothes they actually like.
How to sort newborn clothes
Try to divide by both size and function:
| Category | What to include | Storage idea |
|---|---|---|
| Everyday wear | Onesies, sleepers, easy outfits | Top drawer or closest shelf to changing area |
| Going out | Layered outfits, hats, socks | Separate bin or drawer, so you do not mix them in daily rush |
| Backup / messy | Older, more worn items for spit-up or blowouts | Labeled bin near changing area |
| Too big (future) | Next sizes you own already | Clearly marked box on a higher shelf |
You only need the current size and maybe one size up within easy reach. Everything else can be stored away, so your drawers do not overflow.
Consider keeping 2 or 3 full backup outfits already matched (onesie + sleeper + socks) in a small basket. When you are tired, “grab a full set” is easier than choosing pieces.
7. Prepare your bathroom and baby washing setup
Babies do not need long baths every day. They do need safe, quick washing when needed, and that can get tricky if your bathroom is small or your tub is deep.
“You can just hold the baby in the big tub and rinse them.”
That can be risky. Wet, soapy babies are slippery, and bending over the tub right after giving birth can be painful.
Build a safe bathing routine
Focus on comfort for both baby and you:
| Element | Good practice | Why it helps |
|---|---|---|
| Baby tub or support | Use a portable baby tub or sink insert | Better control and less bending |
| Water setup | Test water temperature on wrist, keep temp stable | Prevents burns and chills |
| Towels & washcloths | Soft towels ready before starting | No scrambling with wet baby |
| Products | Mild baby wash; do not overload with different products | Lower chance of skin irritation |
Also plan where you will dry and dress the baby after a bath. A changing table or a soft mat on a bed can work well, as long as you keep one hand on the baby.
If your bathroom is cold, think about heating the room a bit before bath time.
8. Set up laundry routines for tiny, constant loads
Newborns create laundry: clothes, swaddles, burp cloths, bedding. It can feel like a mountain if you do not have a simple routine.
I might be wrong, but one of the sneaky stress points is mixing baby laundry with all other laundry, then feeling buried by giant loads.
Plan where baby laundry lives
You need:
| Item | Purpose | Tip |
|---|---|---|
| Dedicated hamper | All baby items in one place | Use something easy to carry with one hand |
| Mild detergent | Gentle on sensitive skin | Use same for adults if you want to keep things simple |
| Drying plan | Space on rack or line for small items | Some items dry quickly; keep them rotating |
One common approach: run smaller, more frequent loads rather than waiting for a huge pile. For example, wash every 2 days. That keeps you from waking up to no clean sleepers.
If someone offers help, “Can you run this load of baby laundry?” is a very clear request.
9. Arrange a safe, practical car and entry zone
Getting in and out of the house with a newborn feels more complex than people expect. You have the baby, bags, maybe a stroller, maybe a pet trying to escape.
“The car seat is for the hospital trip; the rest is just like before.”
Life at the door and car changes more than that. Planning this area helps you leave the house without chaos.
Car seat and car prep
Key steps:
| Step | What to check | Notes |
|---|---|---|
| Installation | Car seat installed at correct angle and tightness | Use manual; many places offer free checks |
| Rear-facing setup | Seat placed rear-facing as recommended for infants | Usually in back seat, middle or side |
| Seat usage | Straps at or below shoulders, chest clip at armpit level | Remove bulky coats under straps |
In the car, keep a small kit: spare diaper, wipes, small blanket, extra onesie. That gives you backup for accidents on the road.
Entryway organization
At the door, set up a simple landing zone:
– A hook or shelf for the diaper bag
– Space to park the stroller if you use one
– A spot for baby carrier or wrap
– A small basket for keys, masks, or other small items
You want to avoid juggling items while also holding the baby. The more you can hang or drop right by the door, the smoother your exits and entries will feel.
10. Plan where the baby “hangs out” during the day
Newborns do a lot of sleeping and short wake times, but there are many moments when you need both hands free. Cooking, showering, brushing teeth, answering the door.
I see many parents with a great nursery but no safe place to put the baby down in the kitchen or living room.
Create day “parking spots”
Think of 2 or 3 safe zones where the baby can rest or observe:
| Room | Possible baby spot | Use case |
|---|---|---|
| Living room | Bassinet, portable crib, or firm baby lounger on floor (if safe) | Naps, short awake times while you rest nearby |
| Kitchen | Baby seat on floor, away from heat and edges | Safe while you cook or prep food |
| Bathroom | Bouncer or seat on floor | Place for baby while you shower quickly |
Keep in mind: never leave a baby alone on high surfaces, like counters or sofas. Even if they “do not roll yet”. That first roll happens without warning.
11. Stock practical household items (without going overboard)
You do not need to hoard, but you also do not want to run out of toilet paper on a day you got 3 hours of sleep.
This is less about baby items and more about your basic household supplies, so you are not running errands right after birth.
Think through 2 to 3 weeks of normal use and add a little margin. Toiletries, cleaning products, trash bags, paper goods, basic pantry food. If your budget is tight, focus on the items that cause the most stress if missing.
A simple way to plan is to walk room by room and notice what you use every day:
– Bathroom: soap, shampoo, toilet paper, pads or postpartum supplies
– Kitchen: dish soap, sponges, basic foods, coffee or tea
– Laundry: detergent, stain remover for baby clothes
You might be tempted to buy lots of gadgets. Most parents use only a fraction of what they buy early on. If you are unsure, wait. You can order many things quickly later, once you know what your baby actually needs.
12. Prepare a calm, functional space for you to recover
This part often gets ignored. The home becomes all about the baby, and the person who gave birth ends up healing in a cluttered, chaotic corner.
If you carried the baby, your body will be recovering from birth, surgery, or both. If you did not carry the baby, your body will still be tired from irregular sleep and extra work.
“The baby is the priority now. Parents can take care of themselves later.”
That mindset backfires. When parents are completely drained, everything becomes harder. A bit of planning around your own rest area is not selfish; it helps the whole family.
Your recovery corner
Think about where you are likely to rest most: your bed or a certain couch.
Set up:
| Item | Why it helps | Where to keep it |
|---|---|---|
| Comfortable pillows | Support back and neck for long sitting periods | Bed or main chair |
| Postpartum supplies | Pads, pain relief, peri bottle, etc. | Bathroom basket or nearby drawer |
| Water & snacks | Maintain energy without constant trips | Nightstand or side table |
| Phone & charger | Communication, entertainment, support | Within reach of your rest spot |
If partners or support people are involved, talk openly about protecting this recovery time. Simple tasks like refilling your water or bringing meals to your spot can make a real difference.
13. Organize for visitors, boundaries, and help
Visitors can be great or draining, depending on how they arrive and what they do. Your home setup can support better visits.
I might be wrong, but many new parents are too vague with offers of help. People say “Let me know if you need anything” and then nothing happens, because no one knows what to ask for.
Set physical and social boundaries
Some ideas:
– Decide which rooms visitors can access freely (living room, kitchen) and which stay private (bedroom, nursery if you prefer).
– Keep extra hand soap and a towel by the sink so visitors can wash hands before holding the baby.
– Prepare a simple script for what you do and do not want. For example, “We are keeping visits to one hour so we can rest” or “We prefer no drop-in visits; please check before coming.”
You can also make a short list of tasks that are actually helpful:
| Task | Why it helps | How to phrase it |
|---|---|---|
| Doing a sink of dishes | Clears space fast | “If you want to help, dishes are always welcome.” |
| Folding baby laundry | Reduces your to-do list | “There is a basket of clean clothes that needs folding.” |
| Bringing a meal | Takes pressure off meal prep | “A meal that reheats well is very helpful right now.” |
Being direct can feel strange, but clear requests usually make people feel useful instead of awkward.
14. Create simple systems for noise, light, and routine
Newborns do not follow strict schedules, but your home environment still shapes their patterns and your stress level. Light, noise, and temperature are easy to ignore until they cause problems.
“You must keep everything silent while the baby sleeps or they will not rest well.”
That advice can turn your home into a tense, quiet space where everyone tiptoes. On the other side, constant loud noise can keep a baby overstimulated.
Light and noise adjustments
Think through:
| Factor | Adjustment | Effect |
|---|---|---|
| Daylight | Let light in during daytime feeds and play | Helps baby slowly learn day vs night |
| Night light | Use dim, warm lights for night feeds | Prevents full wakefulness |
| Background noise | Normal household noise is fine; some use white noise | Can keep baby from waking at every small sound |
| Sudden noise | Try to avoid sharp, loud sounds near sleep times | Reduces abrupt awakenings |
You do not need total darkness or silence. A balanced environment where life goes on, but with some thought, usually works better in the long run.
Micro-routines for your own sanity
You are not building a strict schedule; you are building anchors.
Simple anchors might be:
– Morning: open curtains, have your coffee or tea in the same chair with baby.
– Evening: dim lights, quieter sounds, lighter activity.
– Bedtime: a simple pattern before night sleep (fresh diaper, feed, brief cuddle, then bed).
These gentle patterns help you feel less lost in time and give your baby subtle cues. They also give your day structure without locking you into a rigid plan.
Putting it all together without burning out
At this point, you might be thinking, “Fourteen areas? That sounds like a lot.” You are not wrong. If you treat all 14 as huge projects, you will feel stuck.
Here is a more realistic way to sequence them, based on what tends to matter first:
| Phase | Focus areas | Goal |
|---|---|---|
| Phase 1 | Sleep space, night zone, diaper stations | Cover core needs for those first days at home |
| Phase 2 | Feeding setup, car & entry zone, basic safety checks | Support daily routines and safe outings |
| Phase 3 | Clothes system, laundry, bathing setup | Reduce hidden stress from mess and hygiene |
| Phase 4 | Parent recovery corner, visitor boundaries, noise & light systems | Protect your energy and mental space |
You do not need everything perfect before the birth. If time is short, focus on phase 1 and phase 2. Then adjust the rest after you meet your baby and see what your days look like.
The real goal is not to create an ideal home. It is to remove enough friction that you can spend more time holding your newborn and less time searching for wipes at midnight.
If any part of your current plan relies on “We will just wing it,” you might want to revisit that. Preparation does not mean control. It means giving your future, tired self a bit of kindness in advance.